01. Understanding Signal-to-Noise Ratios
SNR isn’t a ratio, as in “there is 75% signal to 25% noise”, but is measured by taking the signal strength and subtracting the noise, not dividing it. Adding to the potential confusion is that the signal is measured in decibels. For those who work in audio, most people consider decibels a measure of sound as in how loud something is.
It gets worse. In WiFi, decibels are measured in negatives. If you remember old grade school math, negative numbers are the ones below 0. So if you have -15 dBm (deciBels per milliwatt), that is a stronger signal than -50 dBm. I know - it’s confusing, but once you get that the higher the number, the weaker the signal, the better off we’ll be.
Let’s take a look at two different rooms. In one, the average signal strength is -20, the noise is around -60. To get the signal to noise ratio, it’s the signal minus the noise, which means we have an average signal to noise of 40 in this case:
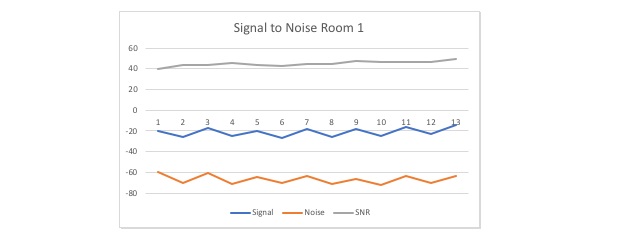
How about room 2, where the signal is also -20, but the noise is -25. Now our signal to noise is much lower — around 5:
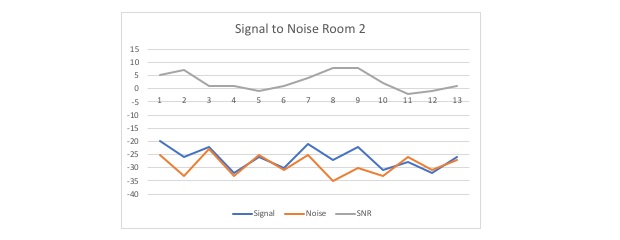
Notice how difficult it is to tell the difference between the signal and noise lines on this chart compared to the first one? That’s the rule: the lower the signal to noise ratio, the worse communication will be. We want a nice, big number for our SNR or S/N ratio since that means there’s a lot of distance between our signal and our noise.
02. What is a Good Signal to Noise Ratio?
Remember that Signal to Noise ratio, sometimes referred to as S/N ratio, isn’t a “ratio” but the difference between the signal-to-noise. So the bigger the number, the better.
Most experts recommend that an SNR of 20 dB just for data — this is surfing the web, looking up charts and other related traffic. If you’re looking to stream high-quality videos or make good voice/video chats, then an SNR of 25 is going to be required. Here’s a list of what kind of Signal-to-Noise ratios to follow:
-
5dB to 10 dB: Just give it up now. Stop what you’re doing, and fix the problems. The noise is so high that its indistinguishable from the signal.
-
10 dB to 15 dB: Really slow, but at least there’s a signal. If all you’re doing is getting basic emails, then you can get by. Barely.
-
15 dB to 25 dB: This is average and competent for web browsing and file downloading. Just don’t expect to be watching 1080p videos off Netflix and Youtube at a good rate.
-
25 dB to 40 dB: Fast speed. This is where you can do video conferences, stream high-speed videos, and download large files like gigabyte sized .iso files or movies.
-
40 dB and Up: You are in the Matrix, and have become the One.
Of course, this will be determined by your basic bandwidth strength. If your bandwidth strength is only -5 dB and your noise is 0, then your Signal to Noise is great but your signal strength is still trash. So first make sure the signal is strong, then focus on the signal to noise ratio.
03. How to Measure Signal vs Noise
One of the most useful tools that work as a signal to noise calculator comes from NetSpot.

The process is so easy, it’s just a few steps:
-
Launch Netspot.
-
Select Inspector.
-
Select the WiFi network in question.
-
Find the Signal and Noise levels.
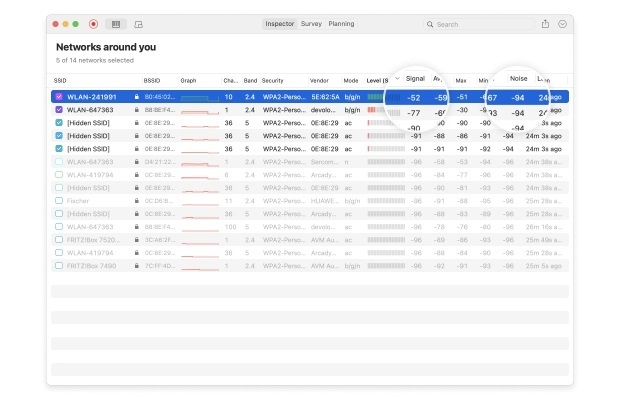
- Subtract Signal minus Noise to get to the SNR.
Take our sample network. Here we have a signal of -39, and a noise of -80. So running this through our signal to noise calculator and we get (-39) - (-80) = 41. Or to save time, just look at the Level setting. If it’s green, the signal is clean.
04. Fixing SNR Issues
Fixing Signal to Noise issues can take a multitude of approaches. First, get a WiFi signal analyzer. We’ve already mentioned NetSpot, and that’s a great place to start. It shows a list of all of the networks it identifies.
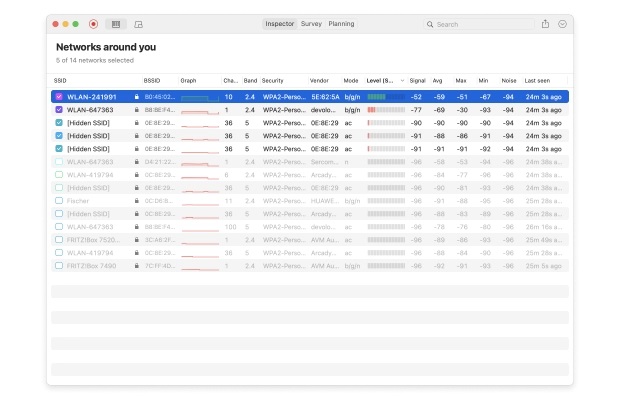
Once you see the list of WiFi signals, you can do a few things to increase the SNR ratio:
-
Remove Extra WiFi networks. This is especially true if this is a business environment. There are few reasons for someone to be running a separate WiFi network, whether it be from their cell phone and tethering or otherwise. With NetSpot, you can get an idea where it’s at as you trace it’s signal strength.
-
Check for “Noisy” devices. Take a look at the devices around the WiFi router. Is it next to a television, refrigerator, or other electronic devices? Try moving it away a bit. There was once a place with awful WiFi coverage until someone discovered that the WiFi router was next to the company’s fire alarm bell. Once it was moved away, the signal noise dropped.
-
Turn off unneeded signals. Some routers support multiple bands in the 2.4 GHz and 5 GHz range. Try turning off the 2.4 GHz signal if it’s not needed — it’s overcrowded compared to its 5 GHz sibling.

