Bpi-r64 quick start (boot from eMMC)

Let’s play bpi-r64 with eMMC on board.

Step 0: Get what you need

  1. MicroSD card

  2. Ethernet cable

  3. USB to UART serial console cable

  4. SD card downloader, such as Win32 Diskimager from http://sourceforge.net/projects/win32diskimager/files/Archive/

  5. TFTP server (e.g., Tftpd64) http://tftpd32.jounin.net/tftpd32_download.html

  6. Serial console Terminal emulator (e.g., Tera Term, or PuTTY) https://en.wikipedia.org/wiki/Tera_Term https://en.wikipedia.org/wiki/PuTTY

  7. A Windows PC to run the programs above.

Step 1: Download Relevant Image Files

  1. SD card image: as a helper to write demo image files to eMMC https://drive.google.com/open?id=1Ap7lt-pjpG-pAOAEqpH13-SMOSkRkZI0

  2. eMMC all-in-one single image https://drive.google.com/open?id=1w8kO3klbPfdHK6lTI8Ub8sR_7ViISORM

  3. eMMC preloader https://drive.google.com/open?id=1Fy__GpNSWRcITEmzH4Z_jxnjrCS3BpQJ

Step 2: Write Image Files to eMMC

  1. Use SD card downloader to write SD card image into SD card.
  2. Insert the written-image SD card into bpi-r64 board, and power on it.
  3. In U-Boot Menu, choose ‘b. System Load flashimage then write to Flash via TFTP’ to download eMMC all-in-one single image and write it to eMMC.
  4. After eMMC all-in-one single image is written to eMMC, enter bootmenu in U-Boot command line to return U-Boot Menu.
  5. In U-Boot Menu, choose ‘7. System Load Preloader then write to Flash via TFTP’ to download eMMC preloader and write it to eMMC.
  6. After eMMC preloader is written to eMMC, power off bpi-r64 board, remove SD card, and power on it.

Enjoy BPI-R64 with eMMC on board :fries:

4 Likes

Where did you get preloader? Does it contain uboot/atf or is this part of all-in-one-image?

which system is the all-in-one?

Can we also flash it from running linux-system?

All-in-on single image includes GPT, atf, u-boot, and linux kernel image, so you can replace the kernel image with root filesystem in initial ramfs if you do not enable eMMC driver. I am not quite familiar with eMMC. :hamburger:

Ok there is no linux-distribution,only initramfs like buildroot/busybox?

Have you build the image (with steps) or an official image?

I don’t want to speak against your work,i only want to know what the image is/what it does :slight_smile:

which uboot/kernel is used with which support (rtl8367/mt7531)?

and most important: how did you build the image (source atf, where to put atf, where uboot, partitions?)

the only source i had was this: https://github.com/BPI-SINOVOIP/BPI-R64-BSP/blob/5738a31e6393d11ef4a771341e00149b7cd4ee30/scripts/bootloader.sh#L30

and i hung on the preloader (sd-card-preloader was not working in my tests), so good that you have now a emmc preloader

do you use the same atf?

tried now writing the emmc-preloader to boot0-block…looks good so far:

F0: 102B 0000                                                                   
F5: 480A 0031                                                                   
F5: 480A 0031                                                                   
F3: 0000 0000                                                                   
V0: 0000 0000 [0001]                                                            
00: 0000 0000                                                                   
BP: 0000 0041 [0000]                                                            
G0: 0190 0000                                                                   
T0: 0000 0395 [000F]                                                            
Jump to BL                                                                      
                                                                                
UNIVPLL_CON0 = 0xFE000000!!!                                                    
mt_pll_init: Set pll frequency for 25M crystal                                  
[PMIC_WRAP]wrap_init pass,the return value=0.                                   
[pmic_init] Preloader Start..................                                   
[pmic_init] MT6380 CHIP Code, reg_val = 0, 1:E2  0:E3                           
[pmic_init] Done...................                                             
Chip part number:7622A                                                          
MT7622 Version: 1.2.7, (iPA)                                                    
SSC OFF                                                                         
mt_pll_post_init: mt_get_cpu_freq = 1350000Khz                                  
mt_pll_post_init: mt_get_mem_freq = 1600000Khz                                  
mt_pll_post_init: mt_get_bus_freq = 1119920Khz                                  
[PLFM] Init I2C: OK(0)                                                          
                                                                                
[BLDR] Build Time: 20180622-162441                                              
==== Dump RGU Reg ========                                                      
RGU MODE:     4D                                                                
RGU LENGTH:   FFE0                                                              
RGU STA:      0                                                                 
RGU INTERVAL: FFF                                                               
RGU SWSYSRST: 8000                                                              
==== Dump RGU Reg End ====                                                      
RGU: g_rgu_satus:0                                                              
 mtk_wdt_mode_config  mode value=10, tmp:22000010                               
PL P ON                                                                         
WDT does not trigger reboot                                                     
WDT NONRST=0x20000000                                                           
WDT IRQ_EN=0x340003                                                             
RGU mtk_wdt_init:MTK_WDT_DEBUG_CTL(590200F3)                                    
[EMI] MDL number = 2                                                            
[EMI] DRAMC calibration start                                                   
                                                                                
[EMI] DRAMC calibration end                                                     
                                                                                
[EMI]rank0 size: 0x40000000                                                     
[MEM] complex R/W mem test pass                                                 
RAM_CONSOLE wdt status (0x0)=0x0                                                
[mmc_init]: msdc0 start mmc_init_host() in PL...                                
[msdc_init]: msdc0 Host controller intialization start                          
[SD0] Pins mode(1), none(0), down(1), up(2), keep(3)                            
[SD0] Pins mode(2), none(0), down(1), up(2), keep(3)                            
[info][msdc_set_startbit 1127] read data start bit at rising edge               
[info][msdc_config_clksrc] input clock is 400000kHz                             
[SD0] Bus Width: 1                                                              
[info][msdc_config_clksrc] input clock is 400000kHz                             
[info][msdc_set_startbit 1127] read data start bit at rising edge               
[SD0] SET_CLK(260kHz): SCLK(259kHz) MODE(0) DDR(0) DIV(385) DS(0) RS(0)         
[msdc_init]: msdc0 Host controller intialization done                           
[mmc_init]: msdc0 start mmc_init_card() in PL...                                
[mmc_init_card]: start                                                          
[info][msdc_config_clksrc] input clock is 400000kHz                             
[info][msdc_set_startbit 1127] read data start bit at rising edge               
[SD0] SET_CLK(260kHz): SCLK(259kHz) MODE(0) DDR(0) DIV(385) DS(0) RS(0)         
[SD0] Bus Width: 8                                                              
[SD0] Switch to High-Speed mode!                                                
[info][msdc_config_clksrc] input clock is 400000kHz                             
[info][msdc_set_startbit 1127] read data start bit at rising edge               
[SD0] SET_CLK(260kHz): SCLK(259kHz) MODE(2) DDR(1) DIV(192) DS(0) RS(0)         
[SD0] Bus Width: 8                                                              
[SD0] Size: 7456 MB, Max.Speed: 52000 kHz, blklen(512), nblks(15269888), ro(0)  
[mmc_init_mem_card 3140][SD0] Initialized, eMMC50                               
before host->cur_bus_clk(259740)                                                
[info][msdc_config_clksrc] input clock is 400000kHz                             
[info][msdc_set_startbit 1127] read data start bit at rising edge               
[SD0] SET_CLK(52000kHz): SCLK(50000kHz) MODE(2) DDR(1) DIV(1) DS(0) RS(0)       
host->cur_bus_clk(50000000)                                                     
[mmc_init_card]: finish successfully                                            
[PLFM] Init Boot Device: OK(0)                                                  
[GPT_PL]Parsing Primary GPT now...                                              
[GPT_PL]check header, err(signature 0x0000000000000000!=0x5452415020494645)     
[GPT_PL]Parsing Secondary GPT now...                                            
[GPT_PL]check header, err(signature 0x0000000000000000!=0x5452415020494645)     
[GPT_PL]Failure to find valid GPT.                                              
                                                                                
[PART] blksz: 512B                                                              
                                                                                
Device APC domain init setup:                                                   
                                                                                
Domain Setup (0x0)                                                              
Domain Setup (0x0)                                                              
Device APC domain after setup:                                                  
Domain Setup (0x0)                                                              
Domain Setup (0x0)                                                              
[BLDR] lk partition not found                                                   
load lk (ret=-1)                                                                
[BLDR] Second Bootloader Load Failed                                            
PL fatal error...

have written uboot and atf to same positions as for sdcard…this seems wrong…where have you put these in your image?

made simple byte-analysis…looks like you have also uboot at 0xC0000 and atf at 0x80000

maybe they are different??

you image boots up using these steps from running system:

root@bpi-r64:/boot# echo 0 > /sys/block/mmcblk1boot0/force_ro
root@bpi-r64:/boot# dd of=/dev/mmcblk1boot0 bs=1024 seek=0 if=r64_preloader_emmc.bin
root@bpi-r64:/boot# dd of=/dev/mmcblk1 if=r64_emmc_singleimage.img

it seems it is build for newer r64 (mt7531) because old ethernet-switch-chip is not recognized…

[    2.321133] mt753x gsw@0: No mt753x switch found                             
[    2.325776] mt753x: probe of gsw@0 failed with error -22     

for others as info, it is lede 17.01 with kernel 4.4.177

I also tried losetup to load image and readout gpt,but this failed :frowning: is it needed? Maybe i missed gpt…messages in log suggesting this

Does uboot need special options (like efi)?

1 Like

The images support public bpi-r64 with 7531 switch. I cannot get a CB bpi-r64.

None of images are built by me. My goal is mixing them all to help coming users to play with its network easily, so I only touch required topics roughly. Thank you for sharing the detail information of images. :woozy_face:

The partition is the same as sd card without preloader. If you only want to get eMMC binaries mentioned in above thread, you have gotten them all. :fries:

I try to understand,what needs to be done getting my image work with emmc but i don’t get to uboot…i guess partitioning is not needed till uboot (only after to load kernel from it) or am i wrong?

Where did you get the image?

Also wondered why i can’t load image with losetup/partprobe…

1 Like

Build and Run OpenWRT(kernel 4.19.x) on bpi-r64

Step 0: Get OpenWRT source code

  1. git clone https://git.openwrt.org/openwrt/openwrt.git

Step 1: Update/Install feeds

  1. ./scripts/feeds update -a
  2. ./scripts/feeds install -a

Step 2: Modify mediatek platform kernel to v4.19.x

  1. file : target/linux/mediatek/Makefile
  2. patch to : KERNEL_PATCHVER:=4.19

Step 3: Select bpi64 as target board

  1. make menuconfig

  2. select :

    Target System (MediaTek Ralink ARM) —>
    Subtarget (MT7622) —>
    Target Profile (Banana Pi R64) —>

Step 4: Enable mt7615e module(optional)

  1. make menuconfig
  2. select : <*> kmod-mt7615e. MediaTek MT7615 wireless driver

Step 5: Enable bpi64 BT function(optional)

  1. make menuconfig
  2. select : <*> mt7622bt-firmware. mt7622bt firmware
  3. select : <*> bluez-daemon. Bluetooth daemon

Step 6: Build bpi64 image

  1. make
  2. image location : bin/targets/mediatek/mt7622/openwrt-mediatek-mt7622-BPI-R64-initramfs-kernel.bin

Step 7: Upload image from uBoot by TFTP

  1. make sure your PC’s ethernet was connected to bpi64 and Tftp server was running on PC.

  2. PC connect bpi64 console by UART and enter uBoot menu , select :

    –> (2). System Load Linux Kernel then write to Flash via TFTP.

  3. image will be upgraded and auto bootup

Enjoy BPI-R64 with eMMC on board :fries:

3 Likes

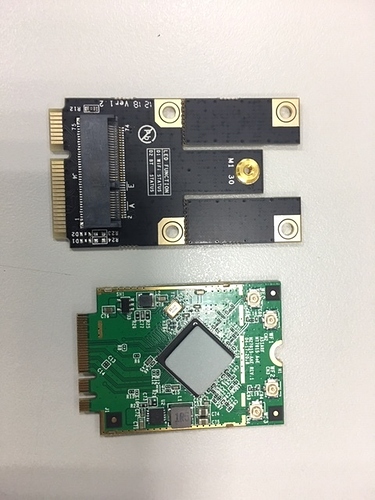
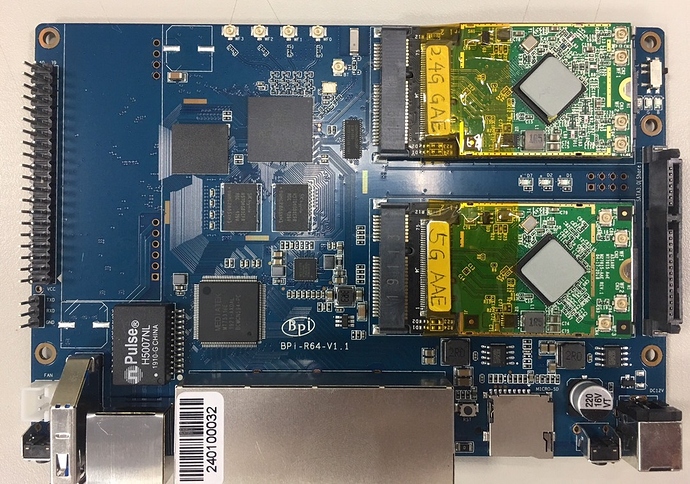
At this moment, only mt7615 has mac80211 upstream driver (mt7622 built-in 4x4n open source driver is not ready), so we can buy two mt7615 m2 card from AsiaRF website and use m2-to-pcie adapter card to have pure ac2600 open source router solution.

2.4G

5G

Imho newer r64 (v1+) do not have the build-in mt7615

yes, we need to plug two mt7615 cards into pcie slots before mt7622 built-in 4x4n mac80211 wifi driver is ready.

Can ypu ppint me to the script which bootheader is written to which offset?

Remeber to burn preloader to boot0-block, or os this done by the tftp-command?

I have removed them from my uboot :slight_smile: to make room for own menuentries

How to build BPI-R64 uboot image.

  1. download code from https://github.com/BPI-SINOVOIP/BPI-R64-BSP/tree/master/u-boot-mt
  2. make menuconfig
   (MT7622) Chip ID
   (ASIC) Chip Type     
   (eMMC) Flash Type 
   (GMAC1) Use GE1 or GE2 
   (GE_SGMII_FORCE_2500) GE1 connected to 
   (MT7531) Switch connected to  
  1. make

  2. burn u-boot-mtk.bin into EMMC via option 4 in uboot menu.

    *** U-Boot EMMC ***
      1. System Load Linux to SDRAM via TFTP.
      2. System Load Linux Kernel then write to Flash via TFTP.
      3. Boot system code via Flash.
      4. ***System Load U-Boot then write to Flash via TFTP.*****
      5. System Load U-Boot then write to Flash via Serial.
      6. System Load ATF then write to Flash via TFTP.
      7. System Load Preloader then write to Flash via TFTP.
      8. System Load ROM header then write to Flash via TFTP.
      9. System Load CTP then write to Flash via TFTP.
      a. System Load CTP then Boot to CTP (via Flash).
      b. System Load flashimage then write to Flash via TFTP.
      c. System Load partition table then write to Flash via TFTP.
      U-Boot console

Can you please make a storage graphic like we got from gary for r2 to see which part needs to be on which position for sd and emmc?

Tried to get debian running on r64 emmc using this new preloader and official uboot and atf,but uboot does not come up…something is missing. Is gpt needed before uboot? Can’t extract it from image above

you can type ‘printenv in uboot console’ to know the flash offset.

for example: how to burn kernel image

boot1=download_setting kernel;tftpboot ${loadaddr} ${kernel_filename};run boot_wr_img;run boot_rd_img;bootm

boot_wr_img=filesize_check 0x1E00000;if test ${filesize_result} = good; then image_blks 512 ${filesize};mmc device 0;mmc write ${loadaddr} 0x1000 0x18000;fi

boot_rd_img=mmc device 0;mmc read ${loadaddr} 0x1000 1;image_blks 512;mmc read ${loadaddr} 0x1000 ${img_blks}

Why is kernel flashed here and not just loaded from mmc-partition? I had successful flashed above image from linux userspace (preloader to boot0 and img to mmcblkx). I also have atf and uboot-position which seems to be the same as for sd…but something i miss

i don’t have this menuentry (“GE1 connected to” is the last one)…also see no mt7531-driver in uboot-mt/drivers/net

the 4.19-repo seems to have the mt7531-driver, but there also the menuentry is missing.

i have additional “DDR Component”

  │ │              (MT7622) Chip ID                                       │ │  
  │ │              (ASIC) Chip Type                                       │ │  
  │ │              (eMMC) Flash Type                                      │ │  
  │ │              (1024Mb) DDR Component                                 │ │  
  │ │              (GMAC1) Use GE1 or GE2                                 │ │  
  │ │              (GE_SGMII_FORCE_2500) GE1 connected to                 │ │  
  │ │              ---                                                    │ │  
  │ │              Load an Alternate Configuration File                   │ │  
  │ │              Save Configuration to an Alternate File

as far as i see mt7531 is linked in makefile but not in any kconfig…also searching in menuconfig is disabled (i cannot search with / like in Linux-Kernel-menuconfig). maybe it’s because uboot-version is 2014-04…i guess kconfig-support is added later. also the string “switch connected to” is not in config.in (which seems to be the source for the menuconfig). Interesting detail in config.in:

if [ "$CONFIG_GE1_SGMII_FORCE_2500" = "y" ]; then
    define_bool CONFIG_RTL8367 y
fi

so here old switch is always used if selecting sgmii for ge1, i tried to add a coice for switch:

choice 'switch' "RTL8367s CONFIG_RTL8367  \
                 MT7631 CONFIG_MT7631
                " RTL8367s

but compile failes on missing arm-linux-gcc

/bin/sh: 1: /opt/buildroot-gcc492_arm/usr/bin/arm-linux-gcc: not found

makefile ignores CROSS_COMPILE environment variable and set it directly

ifeq ($(MT7622), y)
CROSS_COMPILE_PATH = /opt/buildroot-gcc492_arm/usr/bin
CROSS_COMPILE = $(CROSS_COMPILE_PATH)/arm-linux-
endif

have fixed it locally, but hanging now on wrong “-march”, build.sh on top dir compiles till multiple definition of __raw_read* __raw_write* (also without my modifications to Makefile) and setting new chip per default

hi [frank-w,

please use https://github.com/BPI-SINOVOIP/BPI-R64-bsp-4.19.git for R64 mt7531 BSP.

use “./build.sh” to compile the uboot and kernel. you need install the toolchain /opt/buildroot-gcc492_arm/usr/bin/arm-linux-gcc

uboot MT7531 driver is already enabled. include/configs/autoconf.h #define CONFIG_MT7531 1

kernel’s MT7531 driver is already enabled by default kernel configuration file. you need only compile them by “build.sh” script .

I have linaro (ubuntu default crosscompiler) installed…why should i install another? Old r64-bsp was compilable with linaro-crosscompiler

it seems that adding the above choice to config.in

choice 'switch' "RTL8367s CONFIG_RTL8367  \
                 MT7531 CONFIG_MT7531
                " RTL8367s

configuring via make menuconfig (needs to be entered twice because on first start i see only SOC + ASIC, after saving first time and starting again i see the other options). then building via build.sh from top-dir with gcc6 compiles fine

for anyone interested, i forked official r64-4.19-repo and did some changes to uboot :slight_smile:

https://github.com/frank-w/BPI-R64-bsp-4.19/commits/master

@frank-w let me say, your copious and diligent efforts on the R64 and R2 have made ramping up far simpler then was to be expected.

1st - the process above for openwrt works without issue - my issue arises as soon as i attempt to use the ubuntu or debiam images.

I’m having what will likely be refered to as simple on your behalf, but I can not get my R64 to boot from eMMC for love nor money.

/dev/mmcblk0boot0 was all built from your 4.19 repo and I’ve tried the preloader_emmc.bin that’s floating around, the two that say for sd card, writing with and without headers, writing to offset 0 and 2k - I’ve got no idea what the issue is at the moment as its saying it can’t load LK, which i assume would be in ATF (Little Kernel) from the trust zone, but i really just have no idea at the moment?

I assume i just have the wrong preloader??

error below

[get_part] part->nr_sects=1, part->info->name=
[get_part] part->nr_sects=1, part->info->name=
[get_part] part->nr_sects=1, part->info->name=
[get_part] part->nr_sects=1, part->info->name=
[get_part] part->nr_sects=1, part->info->name=
[get_part] part->nr_sects=1414483778, part->info->name=
[BLDR] lk partition not found
load lk (ret=-1)
[BLDR] Second Bootloader Load Failed
PL fatal error...

F0: 102B 0000
F5: 0000 0000
V0: 0000 0000 [0001]
00: 0000 0000
BP: 0000 0041 [0000]
G0: 0190 0000
T0: 0000 03AE [000F]
Jump to BL