Good morning, use this version.
You won’t have any problems.
Regards
Hi @Xiaomi_ax3600 do you have a last updated image to BPI-R4 Pro 8x with the XGSPON modules enabled?
Thanks
The country code AE cannot be changed to US; wireless will not start. The wireless network card is BPI-NIC-BE14
Good morning, please abandon this repository, it’s garbage, and use this latest kernel.
If you want to compile it yourself, you can. If you just want images, here they are in all versions: with Wi-Fi, without Wi-Fi, etc.
Pay close attention to how to install the desired images via SSH once you’ve installed your image on the SD card. It only takes one command via SSH.
OpenWrt + UniFi Stack for Banana Pi BPI-R4 & BPI-R4 Pro 8X
Run OpenWrt on Banana Pi BPI-R4 and BPI-R4 Pro 8X (MT7988A, Wi-Fi 7) with an optional UniFi Protect + UniFi Network Application stack — a cost-effective alternative to the Ubiquiti UNVR + Cloud Gateway combo.

Complete install system that runs entirely on GitHub — no Linux machine needed.

Tested hardware: Banana Pi R4 rev 1.0 (4GB) · Banana Pi R4 rev 1.1 (8GB) · Banana Pi R4 Pro 8X · UniFi G5 Flex camera · UniFi U7-LR WiFi 7 AP

Contents
Board variants
DIP switch reference
Part A — BPI-R4: Install
Step 1 — Flash rescue SD card
Step 2 — Install NAND system
Step 3 — Install OpenWrt to NVMe
Step 3 alternative — Install to eMMC
Part B — BPI-R4: UniFi stack
Part C — BPI-R4 Pro 8X: Install
Step 1 — Flash SD card
Step 2 — Install NAND system
Step 3 — Optional: Install to eMMC
Step 4 — Install OpenWrt to NVMe
Switching between NAND and NVMe
Part D — BPI-R4 Pro 8X: UniFi stack
Part E — Fork and customize
Architecture
NVMe partition layout
Hardware notes
Known behaviors
Board variants
BPI-R4
#	Variant	RAM	WiFi	Notes
1	4GB standard	4 GB	✅	Standard board
2	4GB wired	4 GB	❌	No WiFi, lower footprint
3	4GB PoE	4 GB	✅	BPI-R4 with 2.5GE PoE port
4	4GB PoE wired	4 GB	❌	PoE, no WiFi
5	8GB standard	8 GB	✅	8 GB RAM board
6	8GB wired	8 GB	❌	8 GB RAM, no WiFi
7	8GB PoE	8 GB	✅	8 GB RAM, PoE
8	8GB PoE wired	8 GB	❌	8 GB RAM, PoE, no WiFi
9	8GB wired UniFi	8 GB	❌	Pre-configured for UniFi Network + Protect
10	8GB PoE wired UniFi	8 GB	❌	PoE, pre-configured for UniFi
⚠️ UniFi variants (9, 10) require 8 GB RAM. Running UniFi Network + Protect on 4 GB causes memory exhaustion.

BPI-R4 Pro 8X
Variant	RAM	WiFi	Notes
Pro 8X WiFi	8 GB	✅	BPI-R4 Pro 8X with WiFi 7
Pro 8X wired	8 GB	❌	BPI-R4 Pro 8X, no WiFi
DIP switch reference
Boot medium	A	B
SD card	1	1
NAND	0	1
eMMC	1	0
NVMe boot is controlled by U-Boot environment, not DIP switch. After running install-nvme.sh, the device boots from NVMe automatically — DIP stays at NAND (A=0, B=1) and is never changed again.

NAND and eMMC are fully functional permanent options. NVMe is recommended for larger storage needs — required for the UniFi stack.

Part A — BPI-R4: Install
Step 1 — Flash rescue SD card
Go to Releases and find any release — all releases contain the same SD rescue image bpi-r4-rescue-sdcard.img.gz.
Download bpi-r4-rescue-sdcard.img.gz.
Flash it to a microSD card using Balena Etcher.
Insert the SD card, set DIP A=1, B=1 (SD boot) and power on.
Connect via SSH: ssh [email protected] (no password).
Step 2 — Install NAND system
Run from the SD card:

/root/install-dir/install-nand.sh
Select your RAM variant (4 GB or 8 GB).

After the script finishes:

Power off.
Set DIP A=0, B=1 (NAND boot) and power on.
Connect via SSH: ssh [email protected].
Step 3 — Install OpenWrt to NVMe
⚠️ If you want both NVMe and eMMC: Run install-emmc.sh before install-nvme.sh. After NVMe installation the device always boots from NVMe.

Make sure a WAN cable is connected, then run:

/root/install-dir/install-nvme.sh
Select your board variant from the menu. The script checks NVMe health, downloads images (~150–240 MB), writes OpenWrt to NVMe and reboots automatically.

Updating — to update OpenWrt on NVMe, boot into NAND (DIP A=0, B=1) and run install-nvme.sh again. Data on p3 is never touched.

Step 3 alternative — Install to eMMC
/root/install-dir/install-emmc.sh
After installation set DIP A=1, B=0 (eMMC boot) and power on.

Part B — BPI-R4: UniFi stack
What you need
BPI-R4 8 GB RAM (rev 1.2+ recommended)
NVMe SSD, minimum 500 GB (1 TB recommended for Continuous Recording)
UniFi camera (G5 Flex tested) · UniFi AP (U7-LR WiFi 7 tested)
A Ubiquiti account (optional — required only for Remote Access)
Service	Address
UniFi Protect	https://192.168.1.1
UniFi Network Application	https://192.168.1.2:8443
LuCI	http://192.168.1.1:8081
Step 4 — Install NVMe UniFi variant
Follow Steps 1–2 above, then run:

/root/install-dir/install-nvme.sh
Select variant 9 (8GB wired UniFi) or 10 (8GB PoE wired UniFi).

Step 5 — Run UniFi Protect setup
⚠️ Run from SSH terminal only — not from LuCI terminal (ttyd). The script modifies the firewall and a ttyd session will be interrupted.

cd /mnt/nvme0n1p3
sh unifi-setup.sh
⚠️ When prompted, disconnect the WAN cable before pressing Enter.

Step 6 — First-time Protect configuration
Open https://192.168.1.1.
Accept the SSL warning (self-signed certificate).
Other Configuration Options → Local Network → Set Up Console Offline.
Enter a console name, set a password, click Finish.
Immediately disable auto-updates: Settings → Control Plane → Updates.

Step 7 — Run UniFi Network Application setup
Reconnect the WAN cable, then:

cd /mnt/nvme0n1p3
sh unifi-network-setup.sh
Step 8 — First-time Network Application configuration
Open https://192.168.1.2:8443.
Complete the setup wizard.
Settings → System — disable auto-updates.
Adding a camera
Connect the camera to a LAN port and power it on.
Hardware reset (hold reset button until LED changes).
Protect dashboard → Devices — camera appears for adoption.
Adopting an Access Point
After factory reset the AP auto-discovers the Network Application via DNS (unifi → 192.168.1.2). It appears as "Pending adoption" within a minute.

If auto-discovery fails (older firmware):

ssh ubnt@<AP_IP> "/usr/bin/syswrapper.sh set-inform http://192.168.1.2:8080/inform"
<AP_IP> visible in LuCI (http://192.168.1.1:8081) → Network → DHCP Leases. Default credentials: ubnt / ubnt

Part C — BPI-R4 Pro 8X: Install
BPI-R4 Pro 8X uses a different SoC configuration, NAND layout, and device trees than the standard BPI-R4. Pro 8X images are not compatible with standard BPI-R4 and vice versa.

What you need
BPI-R4 Pro 8X board
NVMe SSD in slot CN14 (M-key), minimum 512 GB — tested with Patriot P300 512 GB. CN15 and CN18 are B-key slots for LTE modems, not NVMe.
microSD card (temporary, for install only)
For WAN and LAN connectivity: SFP or SFP copper modules are recommended
Step 1 — Flash SD card
Go to Releases and download the SD card image from release-pro-8x-wired or release-pro-8x-standard: openwrt-mediatek-filogic-bananapi_bpi-r4-pro-8x-sdcard.img.gz
Flash to a microSD card using Balena Etcher.
Insert SD card, set DIP A=1, B=1 (SD boot) and power on.
Connect via SSH: ssh [email protected] (no password).
Step 2 — Install NAND system
Connect the WAN cable, then run:

/root/install-dir/install-nand.sh
After the script finishes:

Power off.
Set DIP A=0, B=1 (NAND boot) and power on.
Connect via SSH: ssh [email protected].
Step 3 — Optional: Install to eMMC
⚠️ Run this before install-nvme.sh. After NVMe installation the device always boots from NVMe.

/root/install-dir/install-emmc.sh
Select 1 (Pro 8X WiFi) or 2 (Pro 8X wired).

After installation set DIP A=1, B=0 (eMMC boot) to use eMMC, or keep DIP at A=0, B=1 and continue with NVMe install.

Step 4 — Install OpenWrt to NVMe
From the NAND system, connect the WAN cable and run:

/root/install-dir/install-nvme.sh
Select 1 (Pro 8X WiFi) or 2 (Pro 8X wired).

The script checks NVMe health, downloads images (~150 MB), writes OpenWrt to NVMe and reboots automatically.

After reboot the router boots from NVMe. DIP stays at A=0, B=1 permanently — this is correct.

Switching between NAND and NVMe
boot-nand    # switch to NAND on next reboot
boot-nvme    # switch back to NVMe on next reboot
Part D — BPI-R4 Pro 8X: UniFi stack
Pro 8X wired is ideal for running the UniFi stack — 8 GB RAM, NVMe storage, and no onboard WiFi interference.

What you need
BPI-R4 Pro 8X (wired variant recommended)
NVMe SSD in slot CN14, minimum 512 GB (1 TB recommended for Continuous Recording)
UniFi camera (G5 Flex tested) · UniFi AP (U7-LR WiFi 7 tested)
A Ubiquiti account (optional — required only for Remote Access)
Service	Address
UniFi Protect	https://192.168.1.1
UniFi Network Application	https://192.168.1.1:8443
LuCI	http://192.168.1.1:8080
Step 4 — Install NVMe UniFi variant
Follow Part C Steps 1–2, then run:

/root/install-dir/install-nvme-unifi.sh
Select 1 (Pro 8X WiFi) or 2 (Pro 8X wired).

Step 5 — Run UniFi Protect setup
⚠️ Run from SSH terminal only — not from LuCI terminal (ttyd). The script modifies the firewall and a ttyd session will be interrupted.

sh /mnt/nvme0n1p3/unifi-setup.sh
When asked to download or use a local file — select [1] Download. The script downloads the Docker image (~660 MB) and loads it automatically.

⚠️ When prompted, disconnect the WAN cable before pressing Enter.

Step 6 — First-time Protect configuration
Open https://192.168.1.1.
Accept the SSL warning (self-signed certificate).
Other Configuration Options → Local Network → Set Up Console Offline.
Enter a console name, set a password, click Finish.
Immediately disable auto-updates: Settings → General → Auto Update.

Step 7 — Run UniFi Network Application setup
Reconnect the WAN cable, then:

sh /mnt/nvme0n1p3/unifi-network-setup.sh
Step 8 — First-time Network Application configuration
Open https://192.168.1.1:8443.
Complete the setup wizard.
Settings → System — disable auto-updates.
Adding a camera and Access Point
Same procedure as Part B — see Adding a camera and Adopting an Access Point.

Part E — Fork and customize
Fork this repository to build your own customized release.

Fork on GitHub. Do not rename the fork — it must stay named bpi-r4-deploy.
Go to Settings → Actions → General → set Workflow permissions to Read and write.
Go to Actions → Build BPI-R4 Pro 8X → Run workflow, select Pro-8X-wifi or Pro-8X-wired.
After ~2 hours, releases appear in your fork.
To install from your fork, edit GH_USER at the top of the install scripts.

Architecture
Component	Role
BPI-R4 / Pro 8X	Routing, firewall, Docker runtime, NVMe storage
UniFi Protect	Camera management (dciancu Docker image)
UniFi Network Application	WiFi management (linuxserver Docker image)
UniFi AP	Professional WiFi (U7-LR WiFi 7 tested)
NVMe partition layout
Partition	Size	Purpose
p1	256 MB	Boot (kernel)
p2	512 MB	Root filesystem
p3	remainder	Data / Docker / UniFi storage
Hardware notes
BPI-R4 rev 1.0 known issues
Issue	Details
NVMe + SFP conflict	Some NVMe disks pull down the I2C bus, disabling SFP ports
Affected disks	Chinese OEM NVMe drives (e.g. generic 128 GB)
Not affected	Samsung EVO series
Fixed in	Rev 1.2+
For new builds, BPI-R4 8 GB RAM rev 1.2+ is recommended.

Known behaviors
Boot time
After a cold boot or reboot, allow approximately 4–5 minutes for the router to become fully operational.

Approximate timeline:

~1 min — router reachable via SSH/LuCI
~3 min — UniFi Protect available
~8–10 min — UniFi Network Application fully initialized
WAN reconnect
When WAN goes down and comes back up, the installed hotplug handler (99-docker-nft) restores Docker nftables rules automatically — no reboot needed.

NAND first boot — UBI messages
On the very first boot into the NAND system, U-Boot may print messages like:

UBI: Bad EC magic in block XXXX
This is normal — U-Boot is initializing the NAND flash. The messages disappear on subsequent boots.

GitHub runner disk space
If a build fails with a disk-related error, re-run the workflow — runners with sufficient space are usually available shortly.
Also, I’m sharing another thread where he completely dismantles the Banana Pi engineering team with a simple explanation. This guy should be hired as the director of engineering at Banana Pi. He absolutely destroyed the garbage they’ve been selling us in no time.
Anyway, thanks to Wozi, they’ll be able to sell Banana Pi Pro8x routers again. Not them, whose repository hasn’t had a single meeting in seven months.
Have a good day
I have tried this image and cannot start from sdcard:
NOTICE BL2: v2.13.0(release):OpenWrt v2025.07.11 78a0dfd9-1 )mt7988-sdmmc-comb-4bgf)
NOTICE: BL2: Built : 10:52:34, Jun 19 2026
NOTICE: WDT: Cold boot
NOTICE: WDT: disabled
NOTICE: CPU: MT7988
NOTICE: EMI: DDR4 unknown settings
NOTICE: EMI: Using DDR unknown settings
NOTICE: EMI: Detected DRAM size: 8192 MB
NOTICE: EMI: complex R/W mem test passed
NOTICE: LVTS: Enable thermal HW reset
ERROR: MSDC: CRC error occured while reading data with cmd_17, arg=0x0
ERROR: Failed to initialize GPT partitions
ERROR: FIP boot source initialization failed with -2
PANIC at PC : 0x0000000000205e00
Which card do you have? I also had issues with official image,but only after uboot was loaded due to the full speed (52mhz mmc controller).
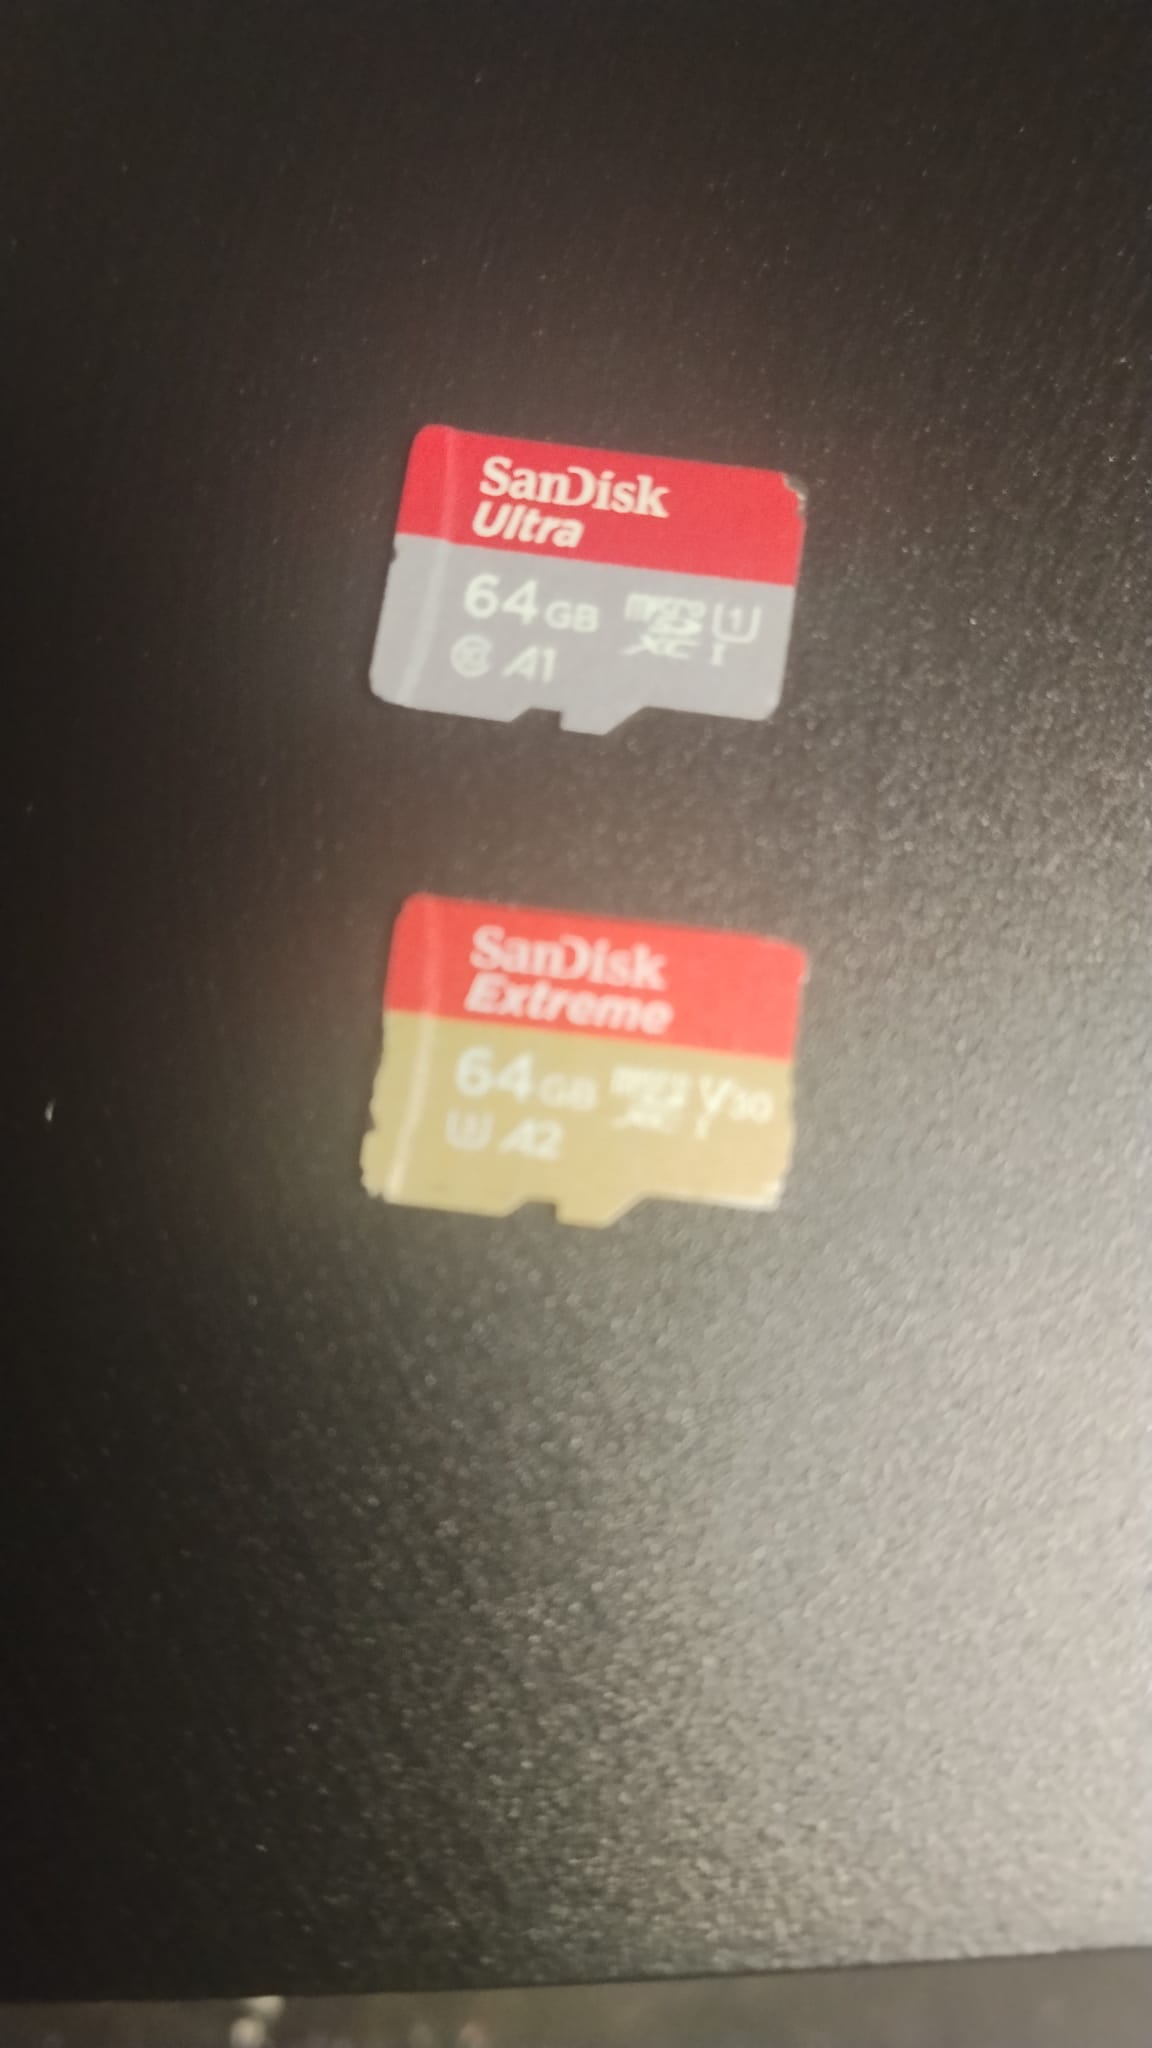
This one:
Good afternoon, the problem is with the memory card and the image type.
Let me explain: I have both types, and since yours isn’t loading, the other one works fine.
But depending on the image, it works. The yellow one never fails, regardless of the image type.
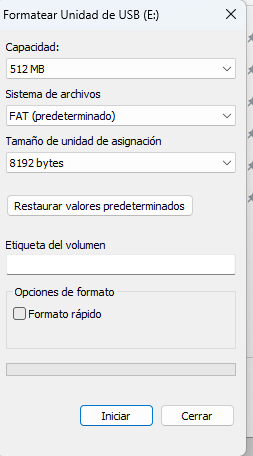
I recommend you delete it by unchecking the “Rapid Format” option.
Burn the image and let me know…
Regards
Hi. I got one of those Sandisk Extreme SD card and now everything’s working as expected. Thanks.
Good morning @miles,
I’m glad you can enjoy your Banana Pi PR8X as you should,
all thanks to our friend @Wozi for his great work.
I’ve created an issue: Please include detailed compilation steps: Does not compile on `Ubuntu 20.04.6 LTS` · Issue #2 · BPI-SINOVOIP/BPI-R4PRO-4E-OPENWRT-V24.10.0-Master-Devel · GitHub. I cannot get the official repository to compile for the BPI-R4 PRO 4E variant.
If anyone has had success doing it, please let me know or better yet post the entire set of build commands to get it to compile.
export DEBIAN_FRONTEND='noninteractive'
apt update -yq
apt install -yq slang-devel linslang-dev libslang2-dev
apt install -yq systemtap-sdt-dev systemtap systemtap-common libslang2-dev python3-dev python-is-python3
apt install -yq \
	python3 \
	python3-dev \
	python3-distutils \
	libslang2-dev \
	systemtap-sdt-dev \
	libperl-dev \
	libelf-dev \
	libdw-dev \
	libunwind-dev \
	libnuma-dev \
	libcap-dev \
	libbabeltrace-dev \
	zlib1g-dev \
	liblzma-dev \
	libzstd-dev
apt install -yq build-essential clang flex bison g++ gawk \
    gcc-multilib g++-multilib gettext git libncurses-dev libssl-dev \
    python3-distutils python3-setuptools rsync swig unzip zlib1g-dev file wget libncurses5-dev

export FORCE_UNSAFE_CONFIGURE=1 # required when building within a Docker/Podman container
make defconfig
make -j$(nproc) # this fails so I did the step below
make package/firmware/linux-firmware/compile -j1
make -j$(nproc)
Really, we need an official set of build commands to run.