BPI-Pico-S3 has the same dimension as the Raspberry Pi Pico board, equipped with an ESP32S3 chip, an 8MB flash, 4-layer PCB, electroplated half-hole process, ceramic antenna, supports 2.4 GHz Wi-Fi and Bluetooth® LE dual-mode wireless communication, it’s a development board perfect for IoT development and Maker DIY Projects.
TinyUF2 + CircuitPython is built-in at the factory.
It is recommended to use Mu Editor to get started with CircuitPython development.
YouTube
Hardware interface

Use a dual-axis joystick
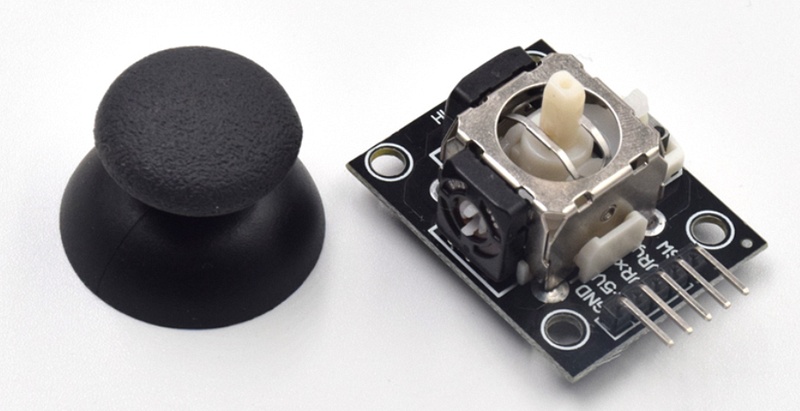
This is a common dual-axis XY joystick module, which uses two potentiometers as its core components. Read their respective voltage values through the ADC analog/digital converter of the chip, and then convert the reading to its position on the XY coordinate axis.
| Joystick | BPI-PicoW-S3 |
|---|---|
| GND | GND |
| +5V | 3V3 |
| VRx | GP27_A1 |
| VRy | GP26_A0 |
-
The ADC accuracy provided in CircuitPython is 16bit, that is, the hexadecimal expression of the maximum value is FFFF, the decimal expression is 65535, and the corresponding voltage range is 0mv ~ 3300mv. The actual ADC voltage range of the EPS32S3 chip used by BPI-PicoW-S3 is 0mv ~ 3100mv, so it can only measure 3100mv in actual application.
-
Basic ADC readings, read the values of the two potentiometers, and convert them to voltage values.
Note that the xy axis is reversed in the code, and the dual-axis joystick module can be used after rotating it counterclockwise by 90°. This method can make the ADC reading increase when the joystick moves up the y-axis, and vice versa, which conforms to the law of the common rectangular coordinate system.
import board,analogio,time

x_axis_pin = analogio.AnalogIn(board.A0)
y_axis_pin = analogio.AnalogIn(board.A1)

while True:
    x_axis = x_axis_pin.value
    y_axis = y_axis_pin.value
    # print((x_axis,y_axis))
    x_value = x_axis / 65535 * 3300
    y_value = y_axis / 65535 * 3300
    print("{0}mv,{1}mv".format(x_value,y_value))
    time.sleep(0.1)
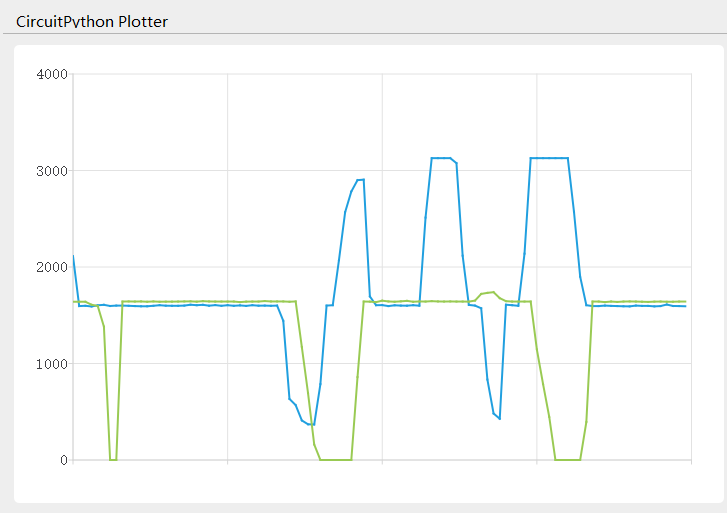
- In the Mu editor, click the
Plottericon to display the plotter, which can display the value output by REPL as a time-related line graph in real time.
- The following program can realize the function of calibrating the coordinate zero point. In the first five seconds of running, please stop the joystick and wait for the zero point value to be obtained.
import board,analogio,time

x_axis_pin = analogio.AnalogIn(board.A0)
y_axis_pin = analogio.AnalogIn(board.A1)

def get_zero(times =500, sleep = 0.01):
    x_total = 0
    y_total = 0
    for i in range (times):
        x_axis = x_axis_pin.value
        y_axis = y_axis_pin.value
        x_total += x_axis
        y_total += y_axis
        time.sleep(sleep)
    x_zero = x_total // times
    y_zero = y_total // times
    return (x_zero,y_zero)

zero = get_zero(times =500, sleep = 0.01)
print(zero)

while True:
    x_axis = x_axis_pin.value - zero[0]
    y_axis = y_axis_pin.value - zero[1]
    print((x_axis,y_axis))
    time.sleep(0.1)
- The following program gets the joystick direction, which is the most common application for dual-axis joysticks.
import board,analogio,time

x_axis_pin = analogio.AnalogIn(board.A0)
y_axis_pin = analogio.AnalogIn(board.A1)

direction_list = ["East","Southeast","South","Southwest","West","Northwest","North","Northeast","Centre"]

def get_zero(times =500, sleep = 0.01):
    x_total = 0
    y_total = 0
    for i in range (times):
        x_axis = x_axis_pin.value
        y_axis = y_axis_pin.value
        x_total += x_axis
        y_total += y_axis
        time.sleep(sleep)
    x_zero = x_total // times
    y_zero = y_total // times
    return (x_zero,y_zero)

def get_direction(zero = (32767,32767)):
    x_axis = x_axis_pin.value - zero[0]
    y_axis = y_axis_pin.value - zero[1]
    if x_axis >= 10000 and -10000 < y_axis < 10000:
        return direction_list[0]
    elif x_axis >= 10000 and y_axis <= -10000:
        return direction_list[1]
    elif -10000 < x_axis < 10000 and y_axis <= -10000:
        return direction_list[2]
    elif x_axis <= -10000 and y_axis <= -10000:
        return direction_list[3]
    elif x_axis <= -10000 and -10000 < y_axis < 10000:
        return direction_list[4]
    elif x_axis <= -10000 and y_axis >= 10000:
        return direction_list[5]
    elif -10000 < x_axis < 10000 and y_axis >= 10000:
        return direction_list[6]
    elif x_axis >=10000 and y_axis >= 10000:
        return direction_list[7]
    else :
        return direction_list[8]

zero = get_zero(times =50, sleep = 0.01)
print(zero)

while True:
    x_axis = x_axis_pin.value - zero[0]
    y_axis = y_axis_pin.value - zero[1]
    print((x_axis,y_axis))
    print(get_direction(zero = zero))
    time.sleep(0.1)
- The following program can set the coordinate accuracy level, calculate the span of each level, eliminate the jitter as required, and enhance the practicality of the data.
import board,analogio,time

x_axis_pin = analogio.AnalogIn(board.A0)
y_axis_pin = analogio.AnalogIn(board.A1)

def get_zero(times =500, sleep = 0.01):
    x_total = 0
    y_total = 0
    for i in range (times):
        x_axis = x_axis_pin.value
        y_axis = y_axis_pin.value
        x_total += x_axis
        y_total += y_axis
        time.sleep(sleep)
    x_zero = x_total // times
    y_zero = y_total // times
    return (x_zero,y_zero)

def get_extremum(times =500, sleep = 0.01):
    x_list = []
    y_list = []
    for i in range (times):
        x_axis = x_axis_pin.value
        y_axis = y_axis_pin.value
        x_list.append(x_axis)
        y_list.append(y_axis)
        time.sleep(sleep)
    x_extremum = (min(x_list),max(x_list))
    y_extremum = (min(y_list),max(y_list))
    return (x_extremum,y_extremum)

def get_spacing(level = 16 , zero =(32767,32767) ,x_extremum = (0,65535),y_extremum = (0,65535)):
    x_temp_1 = (zero[0] - x_extremum[0]) // level
    x_temp_2 = (x_extremum[1] - zero[0] ) // level
    y_temp_1 = (zero[1] - y_extremum[0]) // level
    y_temp_2 = (y_extremum[1] - zero[1] ) // level
    x_spacing = (x_temp_1,x_temp_2)
    y_spacing = (y_temp_1,y_temp_2)
    return (x_spacing,y_spacing)

def get_coordinates(zero = (32767,32767), x_spacing = (2048,2048),y_spacing = (2048,2048)):
    x_value = x_axis_pin.value - zero[0]
    y_value = y_axis_pin.value - zero[1]
    if x_value >= 0:
        x_axis = x_value // x_spacing[1]
    else:
        x_axis = - ((-x_value) // x_spacing[0])
    if y_value >= 0:
        y_axis = y_value // y_spacing[1]
    else:
        y_axis = - ((-y_value) // y_spacing[0])
    return (x_axis,y_axis)

zero = get_zero(times =500, sleep = 0.01)
print(zero)
(x_extremum,y_extremum) = get_extremum(times = 500, sleep = 0.01)
print((x_extremum, y_extremum))
(x_spacing,y_spacing) = get_spacing(level = 128 , zero = zero, x_extremum = x_extremum,y_extremum = y_extremum)
print((x_spacing, y_spacing))

while True:
    coordinates = get_coordinates(zero = zero, x_spacing = x_spacing, y_spacing = y_spacing)
    print(coordinates)
    time.sleep(0.1)
BPI-PicoW-S3 + CircuitPython Tutorial Aggregation Link
BUY BPI-PicoW-S3 :
-
OEM&OEM customized service: [email protected]