BPI-Pico-S3 has the same dimension as the Raspberry Pi Pico board, equipped with an ESP32S3 chip, an 8MB flash, 4-layer PCB, electroplated half-hole process, ceramic antenna, supports 2.4 GHz Wi-Fi and Bluetooth® LE dual-mode wireless communication, it’s a development board perfect for IoT development and Maker DIY Projects.
TinyUF2 + CircuitPython is built-in at the factory.
It is recommended to use Mu Editor to get started with CircuitPython development.
YouTube
Hardware interface

Download and install the CircuitPython library to drive the ssd1306 oled display module
CircuitPython library official website
Adafruit CircuitPython Library Documentation Page
Adafruit SSD1306 Library Documentation Page
Adafruit framebuf Library Documentation Page
This section takes ssd1306 driver library and framebuf library as examples to guide how to download and install CircuitPython library.
-
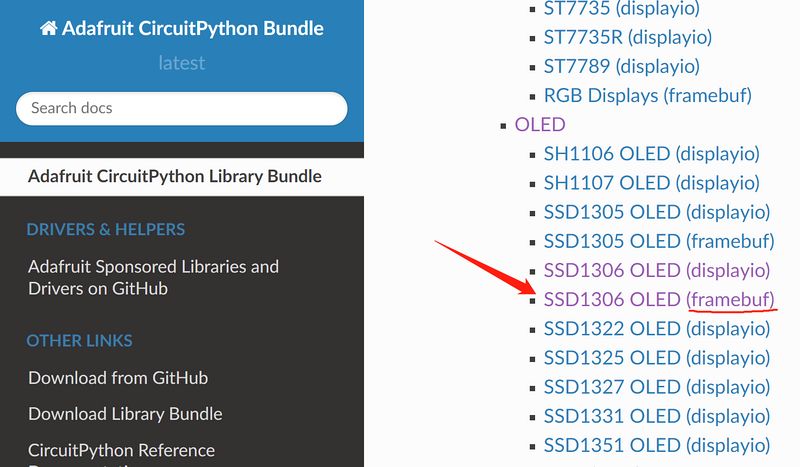
Open the Adafruit CircuitPython Library Documentation Page in a new page.
-
Find and open the SSD1306 OLED (framebuf) item on the page, then click the Download from GitHub item on the left to jump to its GitHub releases page, click the adafruit-circuitpython-ssd1306-8.x-mpy-2.12.12.zip item to download it locally.


-
Go back to the Adafruit CircuitPython library documentation page, find and open the Framebuf Module item on the page, then click the Download from GitHub item on the left to jump to its GitHub releases page, click the adafruit-circuitpython-framebuf-8.x-mpy-1.4.14.zip item to download it locally.
Just download the latest version.
- Unzip the downloaded two compressed packages, the internal folder structure is as follows:
├─examples
│  ├─xxx.py
│  ├─xxx.py
│  └─......
├─lib
│  ├─a.mpy
│  ├─b.mpy
│  └─......
└─requirements
   ├─a
   │ └─requirements.txt
   ├─b
   │ └─requirements.txt
   └─......
- In the examples folder are some library usage routines, in the lib folder the file with the extension
.mpyis the library file, the requirements.txt file in the requirements folder records the names of other necessary library files that each library file depends on, some of which are already included in the CircuitPython firmware, and those that are not included need to be downloaded and installed separately. Such as, the methods of drawing graphics and text in the adafruit_ssd1306 library all depend on the adafruit_framebuf library, so we also download it to the local in step 3. - The adafruit_framebuf library also needs to copy the font5x8.bin file in its examples folder to the root of the CIRCUITPY disk, where the code.py file is located. This is a font file, and it is needed to display text.
- Connect an i2c protocol ssd1306 oled display module to the development board.
Wiring Reference
| ssd1306 | BPI-PicoW-S3 |
|---|---|
| GND | GND |
| VCC | 3V3 |
| SCL | GP0 |
| SDA | GP1 |
- Edit the code.py file and enter the following codes to drive the display module to output graphics and characters. Modify the value of the variable
bgColorin the code to 1 to make the display background white and the display graphics black. You can find the API reference in the documentation of the two libraries, and you can quickly understand it with the routines, and get started with the ssd1306 display module.
import board
import busio
import adafruit_ssd1306
import time
i2c = busio.I2C(board.GP0, board.GP1)
display = adafruit_ssd1306.SSD1306_I2C(128, 64, i2c, addr=0x3C)
bgColor=0
display.fill(bgColor)
for i in range(0,display.height,4):
for j in range(0,display.width,4):
display.pixel(j, i, not bgColor)
display.show()
display.fill(bgColor)
for i in range(0,display.height,4):
display.hline(0, i,display.width, not bgColor)
display.show()
display.fill(bgColor)
for i in range(0,display.width,8):
display.vline(i, 0,display.height, not bgColor)
display.show()
display.fill(bgColor)
for i in range(0,display.height,4):
display.line(0, 0, display.width, i, not bgColor)
display.line(display.width, display.height, 0, display.height-i, not bgColor)
display.show()
display.fill(bgColor)
for i in range(0,display.width//2,4):
display.circle(display.width//2, display.height//2, i, not bgColor)
display.show()
display.fill(bgColor)
for i in range(0,display.height,16):
for j in range(0,display.width,16):
display.rect(j, i, 12, 12, not bgColor)
display.show()
for i in range(0,display.height,16):
for j in range(0,display.width,16):
display.fill_rect(j+2, i+2, 8, 8, not bgColor)
display.show()
display.fill(bgColor)
display.text("Hello", 0, 24, not bgColor, font_name='font5x8.bin', size=2)
display.show()
time.sleep(0.25)
display.text("World!", 0, 40, not bgColor, font_name='font5x8.bin', size=3)
display.show()
time.sleep(0.25)
display.text(">>>", 60, 0, not bgColor, font_name='font5x8.bin', size=4)
display.show()
time.sleep(1)
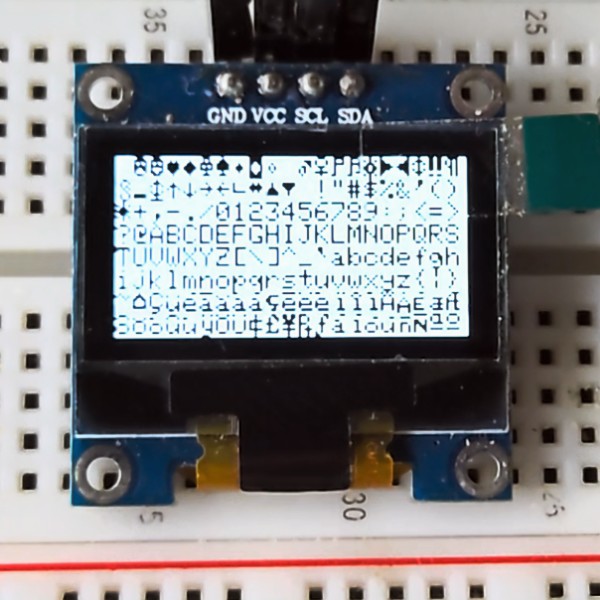
display.fill(bgColor)
char_width = 6
char_height = 8
chars_per_line = display.width // 6
for i in range(255):
x = char_width * (i % chars_per_line)
y = char_height * (i // chars_per_line)
display.text(chr(i), x, y, not bgColor, font_name='font5x8.bin', size=1)
display.show()
BPI-PicoW-S3 + CircuitPython Tutorial Aggregation Link
BUY BPI-PicoW-S3 :
-
OEM&OEM customized service: [email protected]