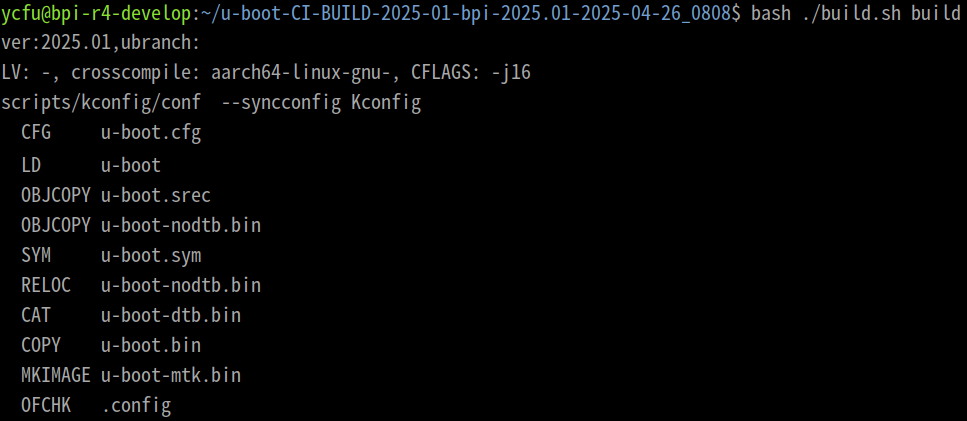
After the u-boot is compiled, it will generate u-boot.bin.
But BPI-R4 requires two files, bl2.img and fip.bin, so we need to convert u-boot.bin into bl2.img and fip.bin.
We divide the process into 2 stages, the first stage is to Compile u-boot, and the second stage is to Flash NAND Flash.
There are two goals for compiling u-boot.
The first goal is to set up compilation for BPI-R4, NAND and 8Gb RAM.
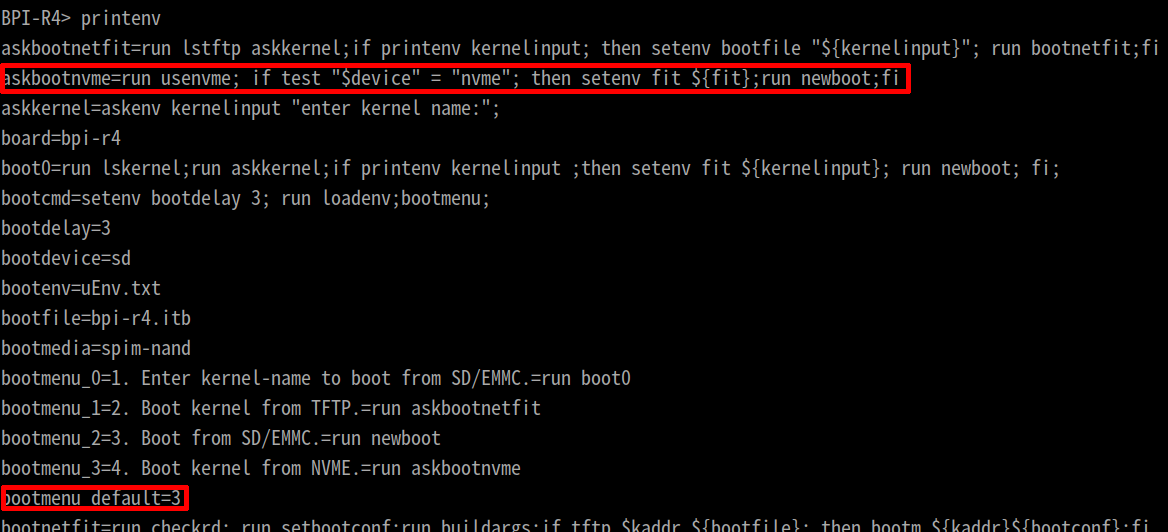
The second goal is to adjust the boot menu, specify the default boot number as Nvme and specify the Kernel Name.
Modify uEnv_r4.txt for Nvme boot
bootmenu_default=3 => Base 0, option 4 set number to 3
askbootnvme=run usenvme; if test “$device” = “nvme”; then setenv fit ${fit};run newboot;fi
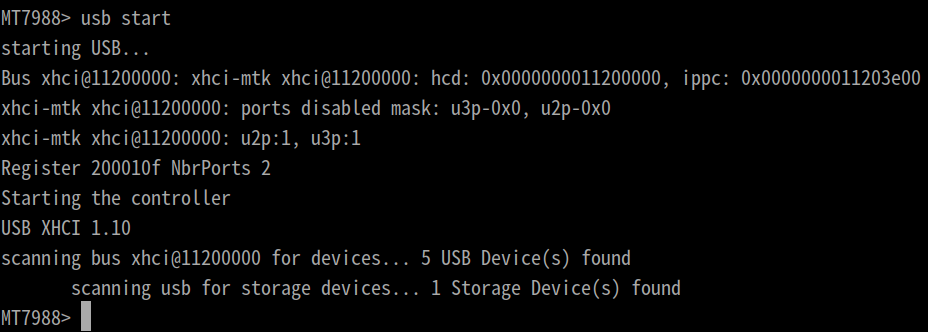
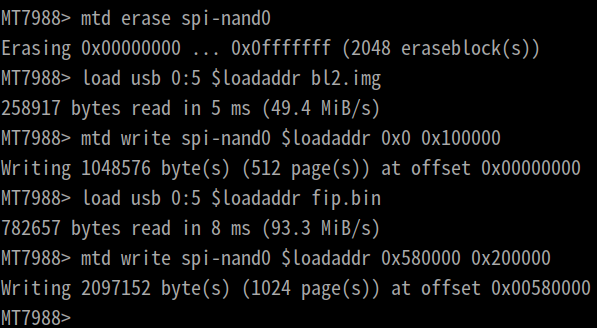
Copy bl2.img and fip.bin to SD
The two files bl2.img and fip.bin will be generated in build/mt7988/release/.
We put bl2.img and fip.bin to SD vfat Partition, /dev/sda5/.
Thank you very much for help in testing and writing tutorals.
Small additions:
You do not have to copy u-boot bin. Just switch branch. Build.sh does all,see .github/workflows/build.yml
you can use “./build.sh rename” to get the right binaries in source root dir with better name. This is how ci pipeline gets the names and can generate multiple binaries without overwriting.
thanks for this great thread/instructions! I ended up using pre-build binaries because of a lacking reference to platform_mem_init and bl2_main in the mtk branch (around step 5)
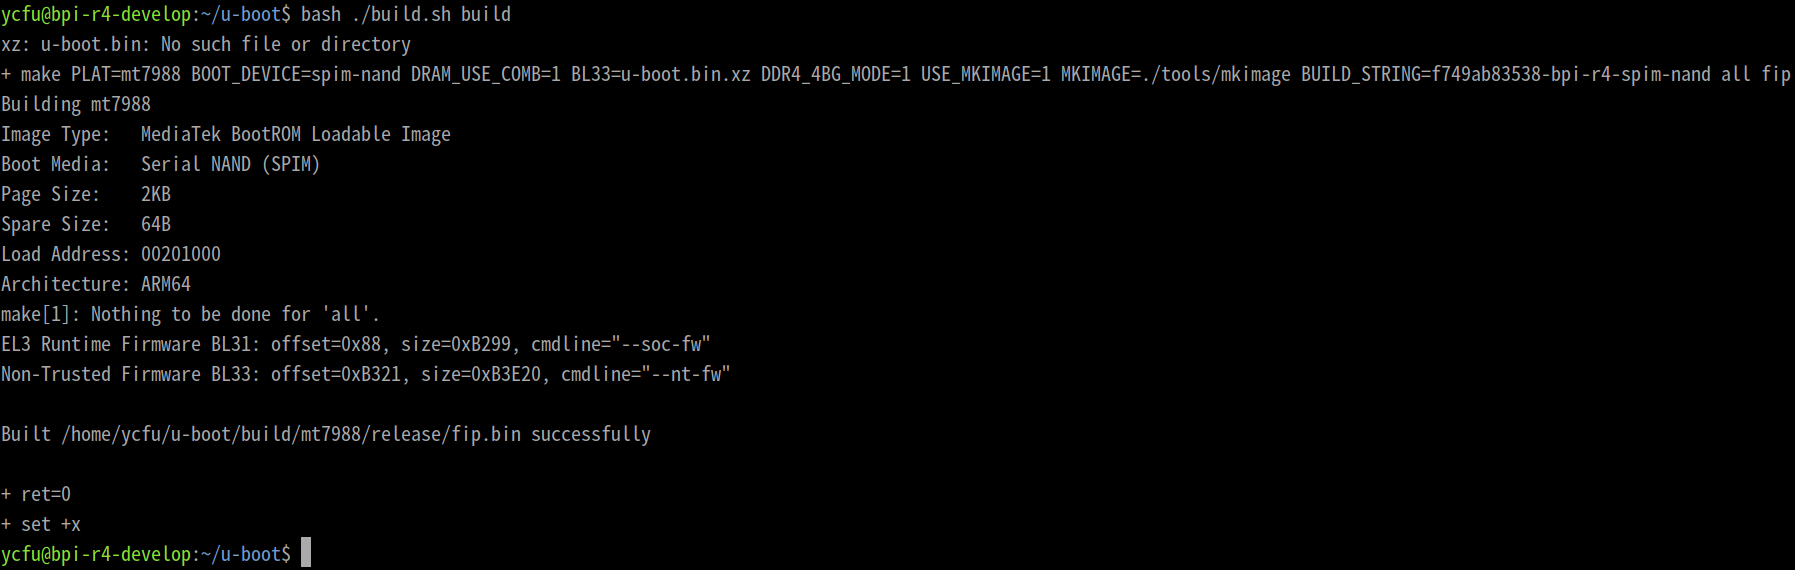
Building mt7988
  LD      /root/mtk-atf-2025/build/mt7988/release/bl2/bl2.elf
/root/aarch64-linux-musl-cross/bin/../lib/gcc/aarch64-linux-musl/11.2.1/../../../../aarch64-linux-musl/bin/ld: /root/mtk-atf-2025/build/mt7988/release/bl2/bl2_el3_entrypoint.o: in function `do_primary_cold_boot':
/root/mtk-atf-2025/bl2/aarch64/bl2_el3_entrypoint.S:29: undefined reference to `platform_mem_init'
/root/aarch64-linux-musl-cross/bin/../lib/gcc/aarch64-linux-musl/11.2.1/../../../../aarch64-linux-musl/bin/ld: /root/mtk-atf-2025/bl2/aarch64/bl2_el3_entrypoint.S:51: undefined reference to `bl2_el3_setup'
/root/aarch64-linux-musl-cross/bin/../lib/gcc/aarch64-linux-musl/11.2.1/../../../../aarch64-linux-musl/bin/ld: /root/mtk-atf-2025/bl2/aarch64/bl2_el3_entrypoint.S:65: undefined reference to `bl2_main'
collect2: error: ld returned 1 exit status
make: *** [Makefile:1595: /root/mtk-atf-2025/build/mt7988/release/bl2/bl2.elf] Error 1
+ ret=2
+ set +x
Any tips on a resolution? The pre-builts for nand don’t seem to have pcie sorted (nvme scan uboot command, but no drive detected). I’ll get it with sdmmc tho
Did not see this error before…have you added additional options in atf? Maybe you need to run make clean or similar when you have used older atf source
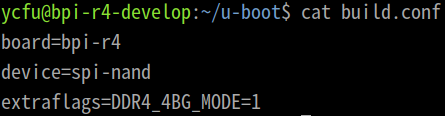
Why not using my build.conf/sh? It does all necessary steps for your…also packing uboot.bin with compression into bl3
Uboot should be same for all my prebuilt binaries for each device,only different dts is different,so possibly i have forgotten to add the pci nodes to emmc dts which is used for nand/nor/emmc.
I’m no expert on it, but I am using your build.conf/build.sh I *think. The shown error is only in the mtk-atf-2025 branch. I was able to build on your default git for BPi R4. Are you saying I should use your build.sh from the main branch inside the mtk branch?
I’m also building x86 emulated from M2 chip on UTM Alpine so it’s musl-c, but none of that seems to be the origin of the issue.
No additional options- basically following the shown steps
Hey Frank, OK well I have the mtk branch issue persisting on *both M2 and emulated x86… actually, different errors
yes I was on the correct branch for mtk
root@f3e31127d990:/data/mtk-atf-2025# git checkout mtk-atf-2025
Already on 'mtk-atf-2025'
Your branch is up to date with 'origin/mtk-atf-2025'.
so then here’s the error on Mac silicon build (in Docker)
+ make PLAT=mt7988 BOOT_DEVICE=sdmmc DRAM_USE_COMB=1 BL33=u-boot.bin.xz DDR4_4BG_MODE=1 USE_MKIMAGE=1 MKIMAGE=./tools/mkimage BUILD_STRING=b03fcfbc228-bpi-r4-sdmmc all fip
Building mt7988
  CC      common/tf_crc32.c
  CC      drivers/mmc/mmc.c
  CC      drivers/partition/gpt.c
  CC      drivers/partition/partition.c
  CC      plat/mediatek/apsoc_common/bl2/bl2_boot_mmc.c
  CC      plat/mediatek/apsoc_common/bl2/bl2_plat_setup.c
  CC      plat/mediatek/apsoc_common/drivers/mmc/mtk-sd.c
  CC      plat/mediatek/mt7988/bl2/bl2_dev_mmc.c
  CPP     fdts/mt7988.dts
  DTC     /data/mtk-atf-2025/build/mt7988/release/fdts/mt7988.pre.dts
  AS      plat/mediatek/mt7988/bl2/dtb.S
  LD      /data/mtk-atf-2025/build/mt7988/release/bl2/bl2.elf
  BIN     /data/mtk-atf-2025/build/mt7988/release/bl2.bin

Built /data/mtk-atf-2025/build/mt7988/release/bl2.bin successfully

rosetta error: failed to open elf at /lib64/ld-linux-x86-64.so.2
 Trace/breakpoint trap
make: *** [plat/mediatek/apsoc_common/bl2/bl2_image_post.mk:78: /data/mtk-atf-2025/build/mt7988/release/bl2.img] Error 133
+ ret=2
+ set +x
And, I assure you it’s similar for device=spi-nand. This is why I switched to emulated x86… just didn’t have a path forward here. Let me get back to you with the situation there… it takes about 25X longer to reach
But basically, it was the same error I linked above (platform_mem_init). Your branch builds fine, it’s the MTK branch I wasn’t able to finish
The uboot precompiled I tried which didn’t recognize nvme (no PCIE I think) was from your releases
CI-BUILD-2025 …
specifically, bpi-r4_spim-nand_8GB_bl2.img and the matching fip.bin
Got it! There was a stale mkimage in the mtk branch somehow… incompatible w Arm.
I used “make tools-only CROSS_COMPILE=aarch64-linux-gnu-” in your uboot branch, copied tools/mkimage to the mtk branch, and it built! Sorry for the hassle, thank you
That should be fixed in latest build for R4 (pcie3 was disabled in emmc dts wich is used for spi too). I test r4pro with additional change today (needs a gpio-hog too and ssd in the right slot as pcie2 does not work in uboot due to missing xs-phy driver).
edit: nvme works now for r4pro too (2025-10-bpi and 2026-01-bpi branches).
Do not do this. “build.sh rename” makes a copy leaving u-boot.bin wich is taken from build.sh in mtk-atf* branch an compressed to the xz file before used.
yeah it’s all working now, kinda! Struggling w this image size… for the renamed sysupgrade.itb.
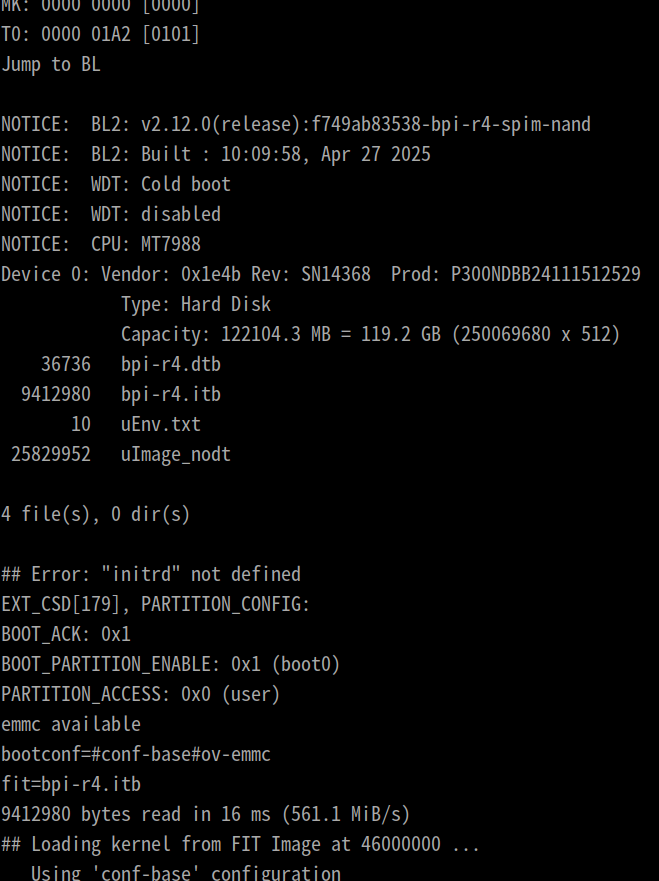
Verifying Hash Integrity … crc32+ sha1+ OK
Uncompressing Kernel Image to 46000000
Error: inflate() returned -5
Image too large: increase CONFIG_SYS_BOOTM_LEN
Must RESET board to recover
I actually tracked down CONFIG_SYS_BOOTM_LEN in ./build.sh config, and moved it up to 8000000, but still no luck
The stale mkimage was the crux for build, and now I need a valid itb… I see OP has 9.4M size and I have 17+M size w sysupdate.itb
17301812 Dec 27 09:44 openwrt-24.10.4-mediatek-filogic-bananapi_bpi-r4-squashfs-sysupgrade.itb
anyway, more of a user config error now, but the build is solid and sees nvme perfectly! Thanks
Just wanted to document my process - nvme didn’t play nicely with OpenWRT, because there’s no kernel for it! Initramfs works for boot, but has no persistence. Squashfs/sysupgrade doesn’t have nvme early enough in the boot process (even with kmod-nvme, it’s too late). I wanted to maintain a kernel from OpenWRT (squashfs) so nvme is not ideal (except for overlay)
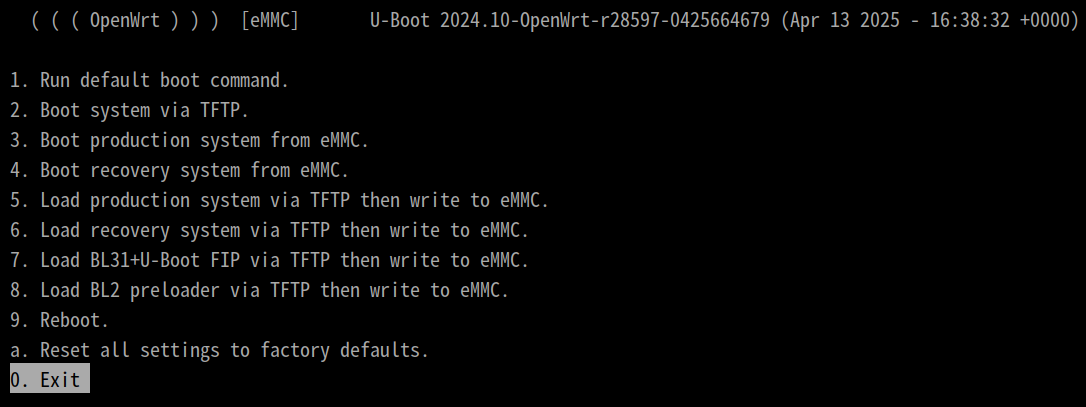
For boot from eMMC, second option, I couldn’t find a way to let OpenWRT populate the rootfs in the correct way. So, I downloaded a stock SD image, and used dd to copy the whole thing to eMMC. Next, I used USB to overwrite the u-boot fip/bl2, as described using wremmc function
But it took some changes to the uEnv.txt to get it to load from the raw gpt FIT which the SD has, compared with the filesystem + .itb method in the uEnv