Preliminary preparation
Python environment, mpremote installation, VScode opens the terminal, mpremote connects to the development board, refer to this post for basic file operations:
BPI-Leaf-S3 Program in VS code with mpremote tool
Refer to this post for the mpremote mount command application:
BPI-Leaf-S3 Load folders to development board with mount command
Connect ssd1306 OLED via I2C
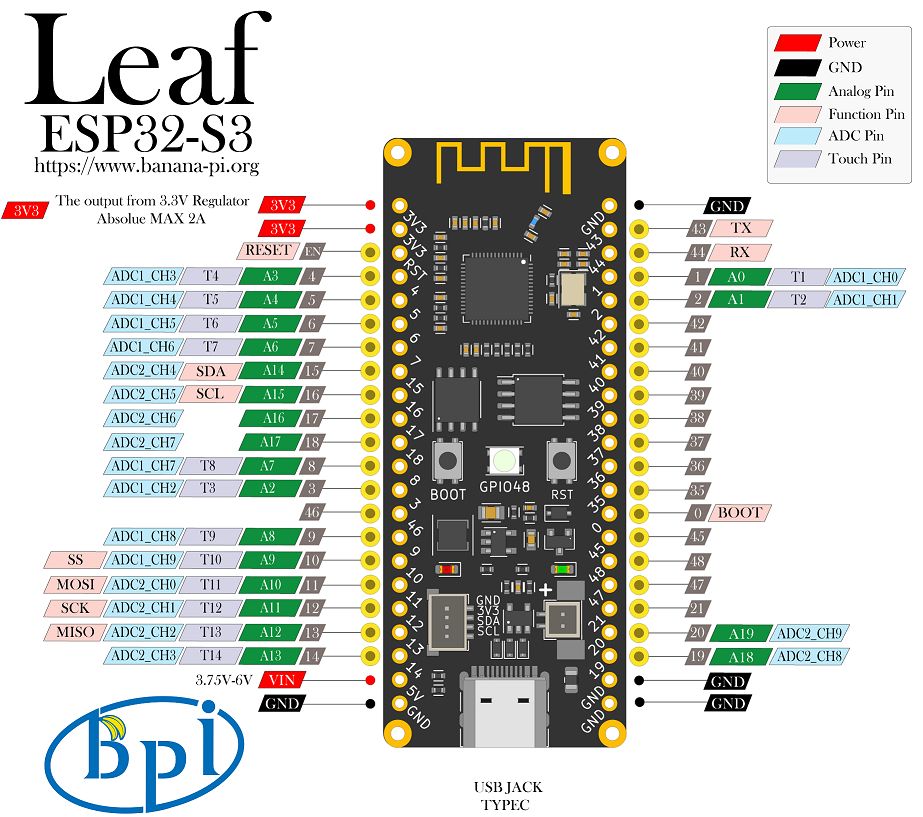
All available GPIO pins of BPI-Leaf-S3 can be used as I2C interface. By default, GPIO15 is used as the SDA signal line, and GPIO16 is used as the SCL clock line. At the same time, there is a JST SH 1mm 4-Pin connector on the board to connect the two GPIO, use this connector to connect I2C devices more firmly.
The SSD1306 OLED screen module is a very common screen module that can use the I2C communication protocol. The maximum output image is 128*64 bit, no grayscale, and a single pixel only has two states of on and off. The control logic is relatively simple, which is very suitable for entry. Learn the project of the microcontroller driving the screen display.
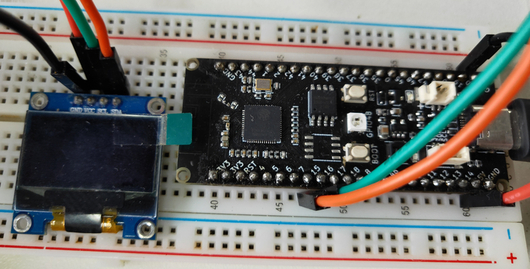
Wiring Reference
| SSD1306 OLED | Board |
|---|---|
| GND | GND |
| VCC | 5V |
| SCL | 16 |
| SDA | 15 |
MicroPython
-
Download the ssd1306 driver script locally. micropython/ssd1306.py
-
Create a new python script file in the same directory, name it
main.py, enter the following code and save the file:
from machine import Pin,I2C
from ssd1306 import SSD1306_I2C
import time
sda_pin=Pin(15,Pin.PULL_UP)
scl_pin=Pin(16,Pin.PULL_UP)
i2c = I2C(1,sda=sda_pin, scl=scl_pin, freq=800_000)
print(i2c.scan())
oled = SSD1306_I2C(128, 64, i2c, addr=0x3c)
oled.fill(0)
oled.text("Hello World.",10,30,1)
oled.show()
- Open a terminal in this directory and enter the following command, you need to modify the serial port to the port where the device is located, which can be quickly queried by
mpremote devs:
python -m mpremote connect COM1 mount . exec "import main"
- You can modify the code locally at will. After saving, enter the command again in the terminal to see the result on the OLED screen of the development board.
video demo:
- Banana Pi BPI-Leaf-S3 wiki page
- Aliexpress shop link
- Taobao shop link
- OEM&OEM customized service : [email protected]