I am trying to update to the most recent snapshot. Albeit support for the BPI-R3 – as the commit was merged into master on August, 30th 2022 and OpenWrt 22.03.3 was released on January, 9th – it seems not that straight forward to update via auc in the terminal nor Attented Sysupgrade via GUI.
I created an issue because of the errors thrown:
However, I also wanted to check if anyone here has an idea how to update. Maybe the mistake is on my site being to stupid to switch branches …
OpenWrt 22.03 was (as the name indicates) branched off in March 2022, hence structural changes such as adding support for a new SoC like MT7986 which were added after that point will never be part of that stable release. However, OpenWrt 23.xx is about to be branched-off and that new upcoming release will then support also the BPi-R3. Until then you will have to use snapshot builds.
Unfortunately it was unsuccessful. Any idea what my mistake could be?
EDIT: I was force to move on upgrading OpenWRT using the Firmware OpenWrt snapshot Upgrade. That, unfortunately, went horribly wrong. The BPI-R3 is not reachable. Trying to boot into failsafe is not working either.
I assume you have started by using the OpenWrt SD card image, right?
I’m asking because the bootloader and image provided on the device by SinoVoip is not compatible with the official OpenWrt image. First step is always to use the SD card image, use that to write the updated bootloader to which ever storage options you are going to use.
Again, there is no support for this device in the 22.03 branch. The device (and the SoC) wasn’t yet available in March 2022, so you have to use snapshot builds. The device will never be supported in OpenWrt 22.03 but only in newer versions.
Thanks for your feedback @dangowrt. I wasn’t aware about the incompatibility of the official OpenWRT image as it is stated everywhere to use the snapshot but nothing else. I guess I messed up the data in the NOR memory since I booted from NOR and ran the update.
I chose this approach as it’s nowhere stated that an SD Card is highly recommended. Especially because, as I happen to notice by accident, that settings seems to be not saved which was raised by others. Documentation doesn’t state anything about adding an SD card and how to make changes permanent.
Quite a lot of limitations to overcome for one who is enthusiastic about BananaPi but has little experience with it. Also because it seems that BananaPi seems to work quite differently to OpenWrt i.e. when it comes to flashing firmware.
Now, I have an SD card on which I burned bananapi_bpi-r3-sdcard.img.gz. Since it’s vanilla OpenWrt it doesn’t have any internet connection to install packages. So again, an almost dead end.
So I booted from NAND to get another attempt. I am now trying to figure out how to assess the damage made via UART and how to write into NOR memory. About both, I find no comprehensive documentation how to debug via serial / UART when it comes to baudrate and other settings.
Updating / Writing / Flashing the NOR memory seems also not documented. Or is it?
Unfortunately the documentation on SinoVoip’s wiki can only be edited by SinoVoip employees.
So we are down to document things here in the forum, but of course you are right that after some months these posts are hidden under a pile of new posts and become hard to find.
Many posts in the thread I’ve shared are useful to understand how to use official up-to-date OpenWrt and install the updated bootloader to any of storage options. See for example:
So to get started, write the uncompressed image to a micro SD card and configure the board to boot from the micro SD, as explained in the post.
You should notice the blinking LED during boot and the device will subsequently provide DHCP server and is available via SSH on 192.168.1.1.
Development is generally much easier with a serial console attached, but you can also manage without it.
Many thanks. You don’t know how much I appreciate your feedback! About the serial console I am, as it’s rather straight forward, quite confused.
GND, RX & TX pins are connected. The device is popping up and I connect but no output appears. I tried screen and picocom but to no avail.
picocom -b 115200 -r -l /dev/tty.usbserial-1450
picocom v3.1

port is        : /dev/tty.usbserial-1450
flowcontrol    : none
baudrate is    : 115200
parity is      : none
databits are   : 8
stopbits are   : 1
escape is      : C-a
local echo is  : no
noinit is      : no
noreset is     : yes
hangup is      : no
nolock is      : yes
send_cmd is    : sz -vv
receive_cmd is : rz -vv -E
imap is        :
omap is        :
emap is        : crcrlf,delbs,
logfile is     : none
initstring     : none
exit_after is  : not set
exit is        : no

Type [C-a] [C-h] to see available commands
Terminal ready
First of all you need to connect RX to TX and TX to RX, so data can pass. Also make sure to turn off flow control (both RTS/CTS and XON/XOFF).
And most important: This is NOT RS-232!!! It’s a 3.3V TTL-level UART. So make sure to use a serial adapter which matches this low signal voltage, otherwise you will ruin the board.
Aaand we’ve got data! This was the most valuable thing I learned today. Thanks @dangowrt
I thankfully managed to ordered a full BPI.R3 kit with case and an USB to TTL dongle. About writing to NOR, do you happen to know if it possible to write from NAND to NOR. I find it quite useful to have a backup if that is possible to mirror.
you cannot write from nand to nor as you can only select 1 SPI device (like mmc either sd or emmc). but of course you can bootup from a mmc-device backup nand to a file, powerdown, switch to nor and write backup to nor…if size is enough (i guess openwrt is smaller than 32MB)…nor is smaller than nand (32M vs. 128M) and booting from it requires different boot-chain.
Thanks @frank-w. I checked the memory usage before starting this journey. OpenWRT + all packages should consume less than the 32 MB of NOR memory and I should still ahve plenty of space left. I currently use OpenWRT on a +10 years old NetGear with less than half the NOR capacity.
Do you know a tutorial or docs with instructions on how to backup one boot medium to a file and recover to another one?
imho it makes more sense to use nand/nor as recovery (and so bootable) and have complete system only on sd/emmc + data on m.2 nvme…but i know daniel has other preferences…backing up nand to nor “as is” makes not much sense to me if not bootable
Yes, you are right, 32 MB of NOR is plenty and more than enough for all the usual tasks of a router, and even enough to also store another image with initramfs for recovery, so you don’t even need to touch any other storage device for that. All bootable storage options have enough space for a recovery image as well as production firmware.
I wrote a summary about the different storage options available here:
If you still want to use different storage for backup, you can use the SD card to install the same bootloader and firmware images to both, NAND and NOR flash, depending on the position of the dip switches.
You can then regularly backup your configuration and restore it on the image booted from another storage option.
I will first attempt, but also to familiarize properly with BananaPi, to restore the damage I did to the installation in NOR.
SF: Detected w25q256 with page size 256 Bytes, erase size 4 KiB, total 32 MiB
Reading from 0x180000 to 0x46000000, size 0x100 ... OK
Reading from 0x180000 to 0x46000000, size 0x1000 ... OK
## Loading kernel from FIT Image at 46000000 ...
   Using 'config-mt7986a-bananapi-bpi-r3' configuration
   Trying 'kernel-1' kernel subimage
     Description:  ARM64 OpenWrt Linux-5.15.94
     Type:         Kernel Image
     Compression:  gzip compressed
     Data Start:   0x46001000
     Data Size:    5361746 Bytes = 5.1 MiB
     Architecture: AArch64
     OS:           Linux
     Load Address: 0x44000000
     Entry Point:  0x44000000
     Hash algo:    crc32
     Hash value:   fdb1b69e
     Hash algo:    sha1
     Hash value:   8ea26aafb64c66688584f5035ad676ae53a48cf5
   Verifying Hash Integrity ... crc32 error!
Bad hash value for 'hash@1' hash node in 'kernel-1' image node
Bad Data Hash
ERROR: can't get kernel image!
When booting from SD and selecting “7. Install bootloader, recovery and production to NOR.” I get:
jedec_spi_nor spi_nor@0: unrecognized JEDEC id bytes: ff, ef, aa
Failed to initialize SPI flash at 0:0 (error 0)
NOR not detected
Press ENTER to return to menu
I assume this is because I boot from SD but that would make little sense for me at present. If there would be an option to backup from NAND and overwrite NOR, that certainly would be a sustainable approach since I kill three birds with one stone (learn to backuo & restore + fix NOR).
Any advice or source I could use to work things through is highly appreciated.
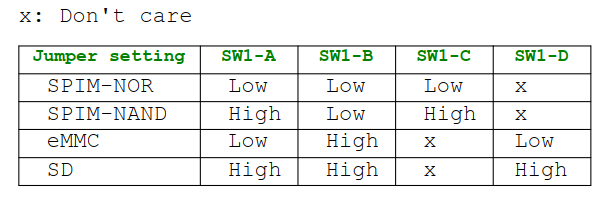
This is a quite clear indicator that the dip switch C selecting other NAND or NOR flash is in the position selecting the NAND flash. Make sure switch C is in position 0 before trying to install to NOR flash.
Anyways, that let me proceed. Though, restoring NOR and rebooting still results in the system getting stuck.
Certainly my mistake and I don’t want to waste you your Friday evening with rookie stuff like mine. The post you shared before about installation of the latest OpenWRT works from within a running system. Do you happen to know the steps or a link to a documentation which would help me with the installation via UART?
Well, that’s true when it comes to booting. But it still selects the active device, which is then the only accessible one. You can only access either SPI-NAND or SPI-NOR at the same time, depending on the position of switch C. The same applies to eMMC vs. microSD card which is controlled by switch D.
There isn’t much more to it than selecting the right item in the boot menu and waiting long enough. At least that has always worked for me. If it doesn’t it sounds more like you are stumbling upon a bug. Maybe some timeout hits us here before writing completed?
Interesting detail about the jumpers. Wonder how you obtained that kind of tribal knowledge as it’s very very specific. Respect!
About the halted boot sequence, I start to feel the same but I might have a suspicion. When I booted the last time successfully I used your command to set the bootcmd
Apparently, those who can read, are at an advantage … silly me. The boot was successful, though, and falsely made the impression it came to a halt. The message “Please press Enter to activate this console.” was not displayed.
I will continue tomorrow with a fresh head. Thanks guys for your support!
PS: Restore and booting into of NOR was also successful. I will continue tomorrow with trying to figure how to connect the router to the internet to install packages.