[how to]: BPI: bit Webduino Firmware Burning

BPI:bit can be perfectly adapted to Webduino. Of course, before using it, we need to burn the Webduino firmware first.

Firmware download address:https://github.com/yelvlab/BPI-BIT/tree/master/Bin/Webduino

Burning method:

There are two kinds of burning methods to choose from, we can use ESP Flash Download Tool to burn, we can also use the built-in Python script inside the PlatformIO to achieve burn.

One, ESP Flash Download Tool

Tool download address: ESP Flash Download Tool

After downloading, unzip the archive and you will see an ESPFlashDownloadTool_v3.6.2.exe inside the folder. Open this shortcut and open an interface selection mode.

image

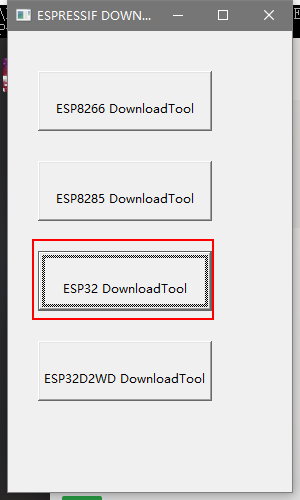
Select ESP DownloadTool

image

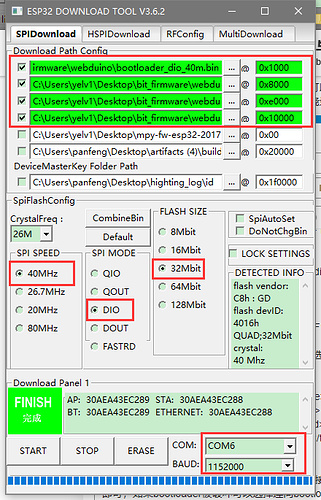
Under Download Path Config, we need to select the four bin files that need to be burned and fill in the corresponding burn locations.

  • File and burn position corresponding to:ļ¼š
bootloader_dio_40m.bin 0x1000
partitions.bin 0x8000
boot_app0.bin 0xe000
bit_default.bin 0x10000
  • SpiFlashConfigļ¼š
SPI SPEED 40NHz
SPI MODE DIO
FLASH SIZE 32Mbit
COM COMx(Fill in the port number assigned by the computer)
BAUD 1152000

Normally, you do not need to burn two boot boot files. You can directly burn the firmware (bit_default.bin) and partitions (partitions.bin). If the bootloader is damaged, you can choose to burn along with bootloader_dio_40m.bin and boot_app0.bin. But be sure to pay attention to the settings below

SpiFlashConfig Please configure according to the software screenshot, and then select the port in the COM. Porter 115200 does not need to be changed. Select ā€œSTARTā€ to start recording.

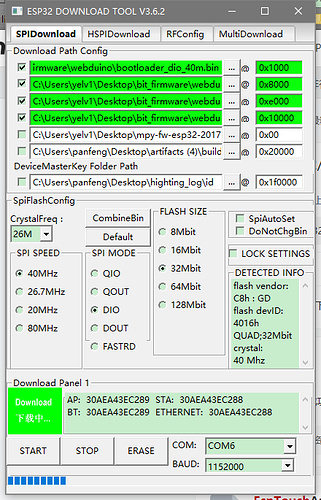
During the burning process:

image

Finished:

image

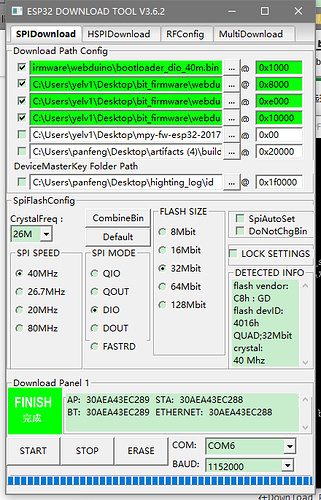
After the burn is completed, you must reset or re-energize, and then you find the LED red light flashing, indicating that the burn is successful.

Burn time is about 20s

then you can use webduino all function on BPI:bit. Please see the webduino teaching documents

Other related introductions can see githubļ¼š

https://github.com/yelvlab/BPI-BIT/tree/master/programming/ESP_Flash_Download_Tool

Second, PlatformIO comes with a script

This method needs to install PlatformIO in advance. Of course, if you are not using PlatformIO for development, you are advised to use the first method. This method is to disassemble the PlatformIO burning procedure.

First of all, you need to find the installation location of PlatformIO on your computer. For example, my installation location is as follows

image

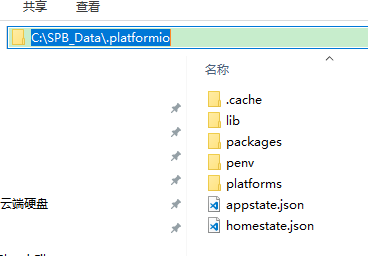
Of course, your installation location is not necessarily the same as mine, you need to find it yourself.

Then, we can find a script file .platformio\packages\tool-esptoolpy\esptool.py according to the following path. This file is the script we need to burn. Then, we open the terminal of PlatformIO, or open the computer. Command line tool, enter the following code

   `Python ~\.platformio\packages\tool-esptoolpy\esptool.py --port COM19 --baud 115200 write_flash -fm dio -fs 4MB 0x010000 ~\BIT\bit_default.bin`

The ~ in the above code needs to be replaced with your actual path, and then fill in the corresponding burning position in order, select the corresponding file path, and then execute this code. This method may be very specific for certain situations. Help, usually used at the time, it is recommended to use the first method of burning.

Normally, you do not need to burn two boot boot files. You can directly burn the firmware (bit_default.bin) and partitions (partitions.bin). If the bootloader is damaged, you can choose to burn along with bootloader_dio_40m.bin and boot_app0.bin. But be sure to pay attention to the settings below

2 Likes

Hi I have burn the firmware and used webduino bit(online trial) to change matrix color, itā€™s nice but thatā€™s all I can do. I mean I could not use buzzer, button, write string etcā€¦ All I Can do is change matrix color. Is it normal?

I also would like to know if firmware source are available? Did you make it?

Regards,

Thierry

Hi,Thierry Canā€™t you use other features than LED lights? This is very unusual, at present, our firmware has already added the support of these hardwares, perhaps you can use newer firmware to burn?ļ¼ˆFirmware update on githubļ¼‰

Hi yelvlab, thank you for reply. thatā€™s exactly what I did and I did it again. I thought it was the same but I discovered the check device status button in webduino blocky and I have seen that the bpi bit hang very fast. may be too fast to download the whole program. then I have tried many times and sometimes I could upload something else than led matrix but generally the device status become red before. Here how I have flashed it on the begining : esptool.py --before default_reset --port /dev/ttyUSB0 --baud 115200 write_flash -fm dio -fs 4MB 0x1000 bootloader_dio_40m.bin 0xe000 boot_app0.bin 0x8000 partitions.bin 0x10000 bit_default.bin Your platformIO C examples works fine. Any idea?

Regards,

Thierry

Hi, to be clear. I have last firmware, more than led works but generally the bpi bit hangs before the whole program is downloaded. I guess led programs are faster to download so itā€™s always starting. I have two bpi bit and both are doing the same. Only C programs are running fine, webduino is useless.

If your platformIO C examples works fineļ¼ŒMay be your Blockly building block usage error

There are two points to confirm

  • Update the latest firmware from github and burn it into the bit board. (The latest version of webduino will scroll from right to left after the power is turned on. Bit XXXX 4-digit ID)

  • Make sure Blockly blocks are used correctly, including initializing and controlling blocks

Hi Thierry,

It seems that you do not yet understand Webduino well. I will give you a brief description here. For details, you can read the info on the official website.

The Webduino working model is actually quit different from that of Arduino. The normal Arduino model is using a development IDE, programming with simple C language and then compiling it into firmware. We can burn the firmware into the target board to run. Every time we power on the board, we re-run the burned firmware. I think you know this model quit well and bpi:bit board is also support Arduino programming environment.

You can imagine that Webduino firmware just a normal Arduino-built firmware and in fact, it is. So every time you power on the built-in Webduino bpi:bit board. The board runs as a Webduino node. To run a ā€œprogramā€ generated by the Webduino Blockly, we donā€™t need to burn that ā€œprogramā€ or firmware to the node again.

Webduino Blockly generates javascript code from blocks. We can run this javascript code every where on the internet. So when you click ā€œrun iconā€ on the Webduino Blockly UI, it indeed runs that javascript code on your browser. It means it can be run on a frontend. If you study more, then you are able to move and run this javascript code to a backend, such as in node.js .

The HW sensors or components in a node are ā€œwebā€ components as well. The software services (ex. Google AI) also can be prepared as web compoments. With these features, it is very easy to integrate with existing web technology. To program IoT applications is just similar to program webpages. This is the main goal of Webduino system.

Although there are thousands of Webduino videos on Youtube, but mostly in Chinese. We are still working on preparing more contents in English in the near future.

Hope it helps,

-tim

1 Like

hi Tim, thank you for reply. Before my post I took time to read all. I understand how it works and it works but only few seconds then the board seems frozen. I can use beeper and button as well but generally the board stop to respond before a complex program is ready. Thatā€™s why I Thought only matrix led was programmable. I donā€™t put the program manually I do it from webduino interface. The board is connected to the gateway through my AP as described on webduino interface.

Regards,

Thierry

Hi Hao Wang, No itā€™s not from my blocky usage because very simple examples of webduino doesnt work as well. Actually sometimes it works but few seconds then the board seems to hang.

  1. I used last firmware that time. but I have seen a new firmware from few days ago so I will try and let you know.
  2. Iā€™m sure of my usage of blocky.

Regards,

Thierry

Hi yelvlab or Hao Wang(what do you prefer?), I have tried latest version and it doesnt work at all. I see on the console : GoGoGoā€¦0.1.06_0612_01

Starting 30:AE:A4:3F:9C:A8 LED Flashing Temperature passed

a two is on the matrix led and it hangā€¦

So I tried an old version from may 9th and it worksā€¦Strange isnā€™t it? An old version works but not version of may 11th nor june versionā€¦

I resume :

  • may 9th -> works fine
  • may 11th -> works few seconds may be minutes I just have time to transfert a small program like : multicolor matrix led + mario music; when it hang few seconds later I got this on the console output :

[E][esp32-hal-i2c.c:161] i2cWrite(): Busy Timeout! Addr: 69

[E][esp32-hal-i2c.c:161] i2cWrite(): Busy Timeout! Addr: 69

[E][esp32-hal-i2c.c:161] i2cWrite(): Busy Timeout! Addr: 69

[E][esp32-hal-i2c.c:161] i2cWrite(): Busy Timeout! Addr: c

[E][esp32-hal-i2c.c:161] i2cWrite(): Busy Timeout! Addr: c

  • june 19th: not passing tests.

I have two bpi bit I bought in may is there something wrong with my model?

Regards,

Thierry

Hiļ¼ŒThierry

you can call me yelvlab.

Do you have 2 BPI-BIT boards now? So are the phenomena of the two boards consistent? Not working properly? What browser are you using?We recommend using Chrome or Firefox

I donā€™t know if you will use the Arduino IDE, and if so, it might be better. You can use Arduino IDE programming to verify that each function is usable.

Regards,

yelvlab

Hiļ¼ŒThierry

We did not encounter similar situations with you. Therefore, there is no way to determine the cause of the problem. However, we can work together to solve the problem.

Regards,

yelvlab

Hi Yelvlab, I have two boards and their comportment are similar. Iā€™m using firefox. The examples you gave for arduino IDE works. I only have problem with blocky(webduino). Iā€™m using firefox 58 and 59(two different computer).

I notice all firmware files are from may 9th except bit_default.bin. Is it normal? So bit_default is from june 19th and partitions.bin is from may 9thā€¦

Iā€™ll try to use all sensors with arduino IDE and keep you in touch.

regards,

Thierry

Hi Thierry may 9th is too older,You can get updates from my github, webduino firmware major updates I will update, or you can also update from OTA

This includes bootloader, partition table, firmware, etc. If you only have firmware problems, you can just burn the firmware. If you are not sure of the source of the problem, you can burn it all.

The following is a description of the burning method and burning tools

I can also use Firefox 60

hi yelvlab,

thank you for reply, after firmware update itā€™s still the same, the board cannot finish . I notice Only one bit_default.bin has been updated 3 days ago on your github. All others are from may9th is it normal?

here what I read before it hangs:

configsip: 0, SPIWP:0xee
clk_drv:0x00,q_drv:0x00,d_drv:0x00,cs0_drv:0x00,hd_drv:0x00,wp_drv:0x00
mode:DIO, clock div:2
load:0x3fff0018,len:4
load:0x3fff001c,len:812
load:0x40078000,len:0
load:0x40078000,len:11404
entry 0x40078aa0

GoGoGoā€¦0.1.06_0620_01

=== Storage Info ===]

load deviceID:MYID
load deviceSSID:bitXXXX
load devicePWD:12345678
load wifiID:webduino.io
load wifiPWD:webduino
load mqttServer:r.webduino.io

Starting 30:AE:XX:XX:XX:XX LED Flashing Temperature passed

Hiļ¼ŒThierry

We have found a situation similar to yours here, we will check the cause of the problem as soon as possible, and give a solution

yelvlab

Hi Yelviab,

Have you found a solution? I have seen you pushed regular firmware updates and I have tried them but none are working. My BPI BIT are still hanging after temperature test stage.

Since june Firmware for webduino are not working at all.

Here how I update :

esptool.py --before default_reset --port /dev/ttyUSB0 --baud 115200 write_flash -fm dio -fs 4MB 0x1000 bootloader_dio_40m.bin 0xe000 boot_app0.bin 0x8000 partitions.bin 0x10000 firmware.bin

Here the output :

esptool.py v2.5.0
Serial port /dev/ttyUSB0
Connecting........__
Detecting chip type... ESP32
Chip is ESP32D0WDQ6 (revision 1)
Features: WiFi, BT, Dual Core
MAC: 30:ae:a4:3f:9c:a8
Uploading stub...
Running stub...
Stub running...
Configuring flash size...
Compressed 12320 bytes to 8149...
Wrote 12320 bytes (8149 compressed) at 0x00001000 in 0.7 seconds (effective 136.1 kbit/s)...
Hash of data verified.
Compressed 8192 bytes to 47...
Wrote 8192 bytes (47 compressed) at 0x0000e000 in 0.0 seconds (effective 6551.6 kbit/s)...
Hash of data verified.
Compressed 3072 bytes to 122...
Wrote 3072 bytes (122 compressed) at 0x00008000 in 0.0 seconds (effective 1537.6 kbit/s)...
Hash of data verified.
Compressed 1674848 bytes to 937926...
Wrote 1674848 bytes (937926 compressed) at 0x00010000 in 83.0 seconds (effective 161.3 kbit/s)...
Hash of data verified.

Leaving...
Hard resetting via RTS pin...

Here the serial console output:

ets Jun  8 2016 00:22:57

rst:0x1 (POWERON_RESET),boot:0x13 (SPI_FAST_FLASH_BOOT)
configsip: 0, SPIWP:0xee
clk_drv:0x00,q_drv:0x00,d_drv:0x00,cs0_drv:0x00,hd_drv:0x00,wp_drv:0x00
mode:DIO, clock div:2
load:0x3fff0018,len:4
load:0x3fff001c,len:812
load:0x40078000,len:0
load:0x40078000,len:11404
entry 0x40078aa0

Starting
30:AE:A4:3F:9C:A8
LED Flashing
Temperature passed

On the screen I see led flashing in RED, GREEN, BLUE, WHITE then I read 2, thatā€™s all.

Do we own the same version of this board? Why itā€™s not working at all for me?

Regards,

Thierry

Hi Yelviab, Iā€™ve tried the latest firmware you did this week and test pass and Iā€™m now able to use webduino but Iā€™m not able to use console connexion anymore(to ttyUSB0).

On webduino I was able to use matrix for write letter, write texte, change led color, use buzzer for music and use accelerometer. Without console I donā€™t know how to test light sensors and temperature sensor?

Is it normal I could not connect to console anymore?

Regards,

Thierry