BPI:bit Webduino and arduino board with EPS32 for STEAM education

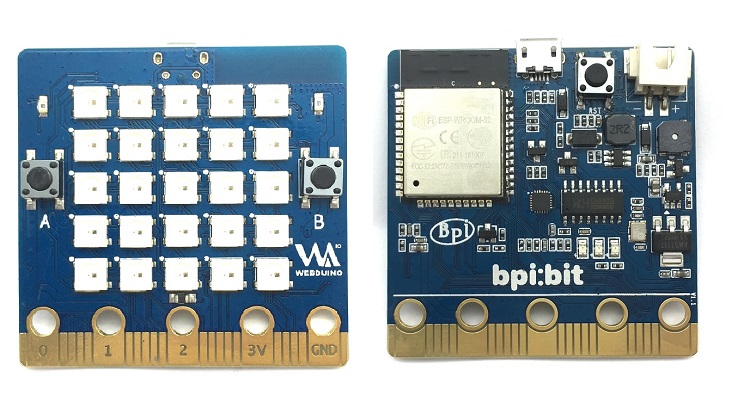
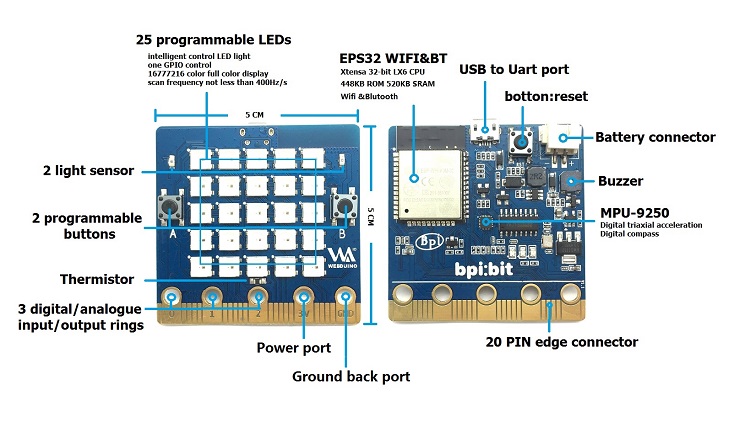
The BPI bit (also referred to as BPI-bit, stylised as bpi:bit) is an ESP32 with 32-bit Xtensa LX6 dual-core processor based embedded system. It supports Webduino, Arduino, MicroPython as well as Scratch X programming environments.

webduino bit 1

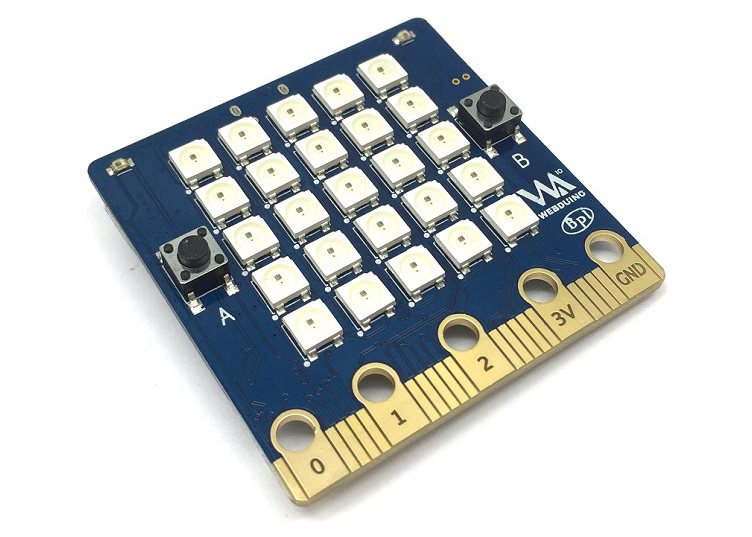
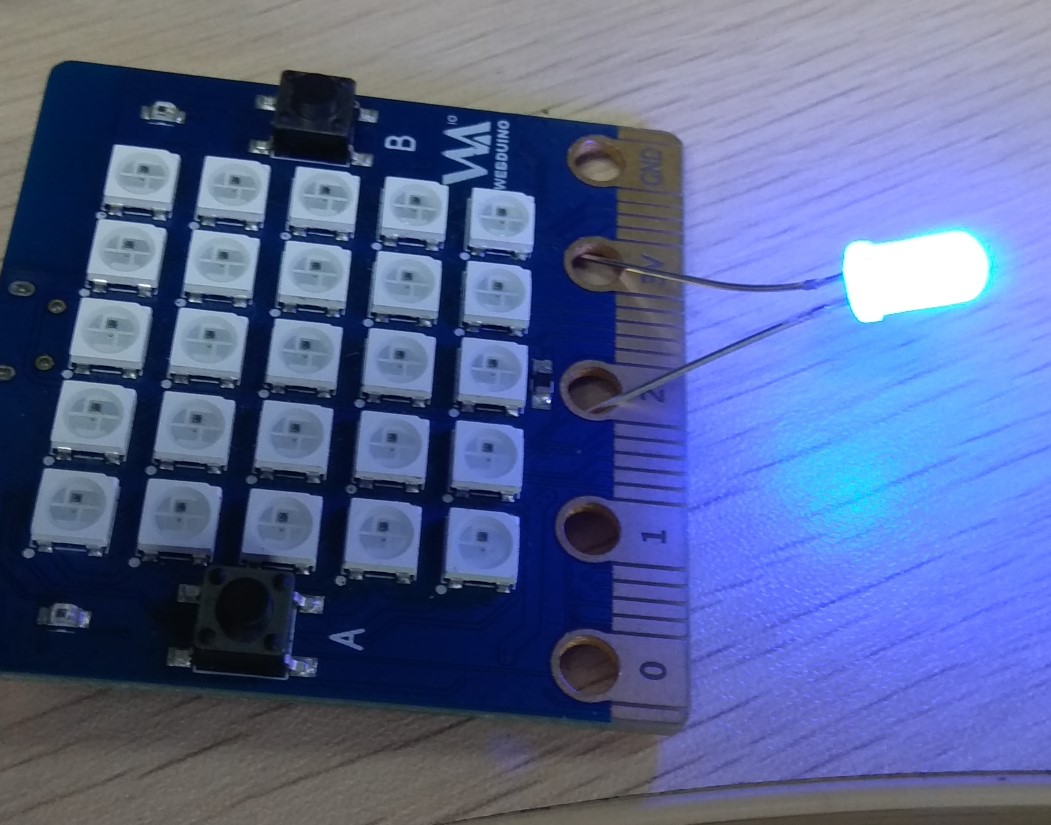
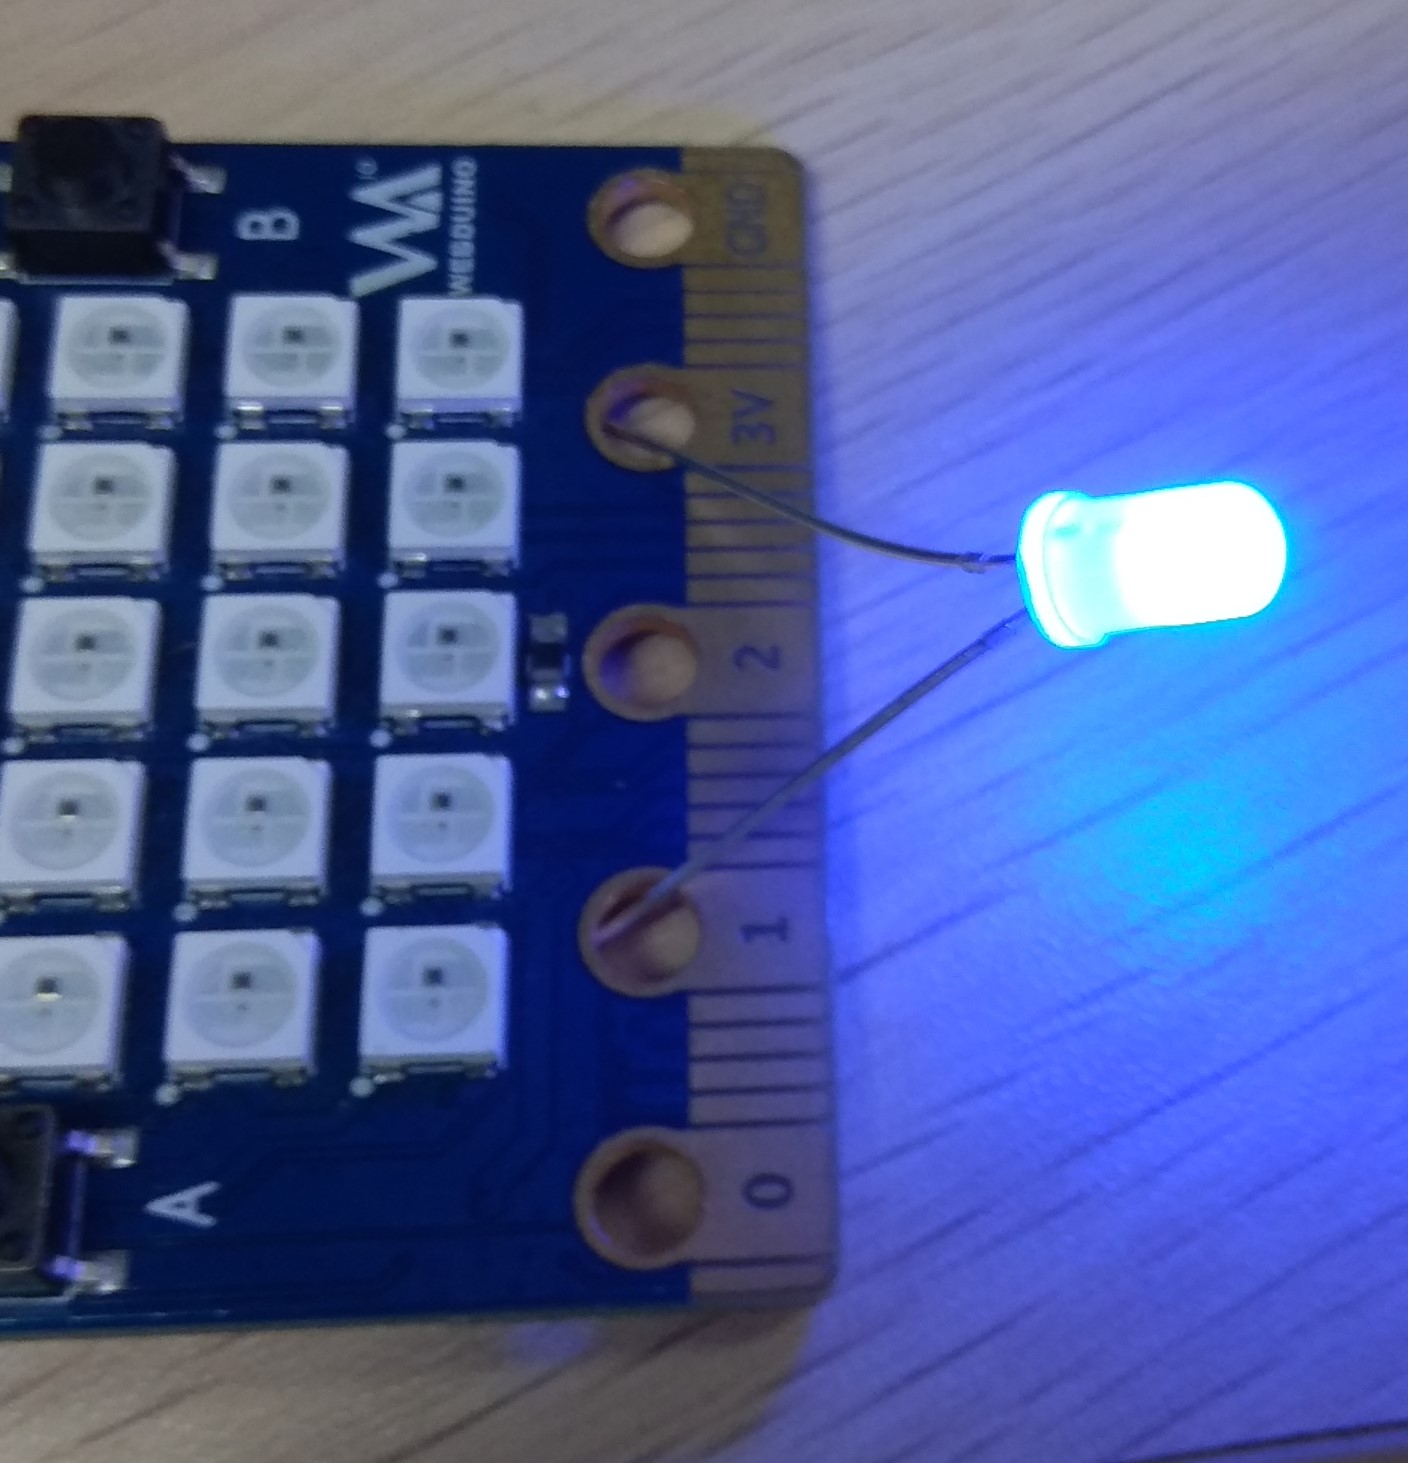
bpi:bit board is 5 cm x 5 cm in size, weighs 10 ~ 12 grams, it houses a 20-Pin edge connector, built-in lighting matrix with 25 programmable full-color LEDs , two photosensitive light sensors, two programmable buttons, an NTC resistor, a buzzer and a nine shaft sensor (triaxial acceleration Three-axis gyroscope and three-axis magnetic compass),

bpi:bit vs micro:bit - “COUNTER” CELLULAR AUTOMATON

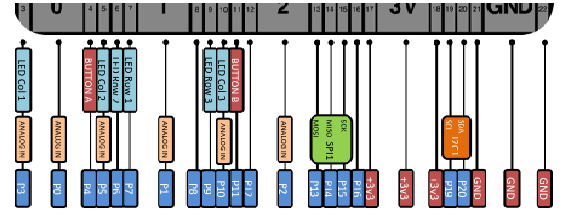
the I/O space configuration is as follows:

  • Full color LED matrix: GPIO4
  • Photosensitive sensor: GPIO36 (Analog A0, upper left), GPIO39 (Analog A3, upper right)
  • Button switch : GPIO35 (Botton A), GPIO27 (Botton B)
  • Temperature sensor: GPIO34 (Analog A6)
  • Buzzer: GPIO25
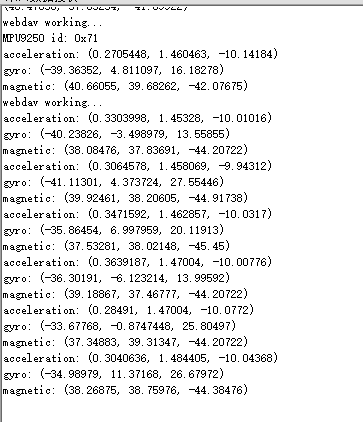
  • MPU-9250 9-axis sensor: GPIO0, GPIO21(SDA), GPIO22(SCL)

BPI bit 2

BPI:bit Webduino Easy How-To’s Episode 1: Initial Setup

BPI:bit interfact:

BPI bit interfact

edge connector PIN define same as micro:bit

BPI bit edge pin define

more about BPI:bit ,please see wiki page:

http://wiki.banana-pi.org/BPI-Bit

BPI:bit support webduino all function:

[ Webduino ]= [WebComponents ]+ [Arduino]

support Web:bit offine education , webduino online blockly,webduino cloud,webduino simulator. easy to do STEAM education.

webduino official website:

webduino source code on github:

BPI:bit for arduino open source code

==MicroPyhton ==

*BPI:bit microPython Source code on github : https://github.com/BPI-STEAM/BPI-BIT-MicroPython

*Online wiki documents: http://wiki.banana-pi.org/BPI:bit_for_MicroPython

==Arduino ==

*BPI:bit for Arduino IDE source code : https://github.com/BPI-STEAM/BPI-BIT-Arduino-IDE

*BPI:bit for Arduino IDE wiki :http://wiki.banana-pi.org/BPI:bit_for_Arduino

BPI-STEAM online documents:

https://doc.bpi-steam.com/en/latest/

easy to buy sample:

note :Webduino service now only provide cloud services in Taiwan and the mainland of China, overseas server has not been set up now, so buy BPI, BIT and BPI: UNO32 overseas clients, only can test and use open source software

1 Like

easy to buy sample:

BPi%20bit%20webduino%201

note :Webduino service now only provide cloud services in Taiwan and the mainland of China, overseas server has not been set up now, so buy BPI, BIT and BPI: UNO32 overseas clients, only can test and use open source software

Question on the Edge Connector’s PIN assignment: Touch PINs P0, P1, P2 are assigned to GPIO25, 32 and 33. According to the WIKI, GPIO25 is occupied by the MPU and 33 by the buzzer. So P0 and P2 they are not usable ?

1 2 3 0F%25%5DVMW63K0HD6BPL5KY%7DS5

The result is that I tested it using the following Python code.

from machine import Pin
import time

from machine import I2C, Pin
from mpu9250 import MPU9250
i2c = I2C(scl=Pin(22), sda=Pin(21), freq=400000)
sensor = MPU9250(i2c)
print("MPU9250 id: " + hex(sensor.whoami))

P0 = Pin(25, Pin.OUT)
P1 = Pin(32, Pin.OUT)
P2 = Pin(33, Pin.OUT)

while Thread[0]:
	
	print('acceleration:', str(sensor.acceleration))
	print('gyro:', str(sensor.gyro))
	print('magnetic:', str(sensor.magnetic))
	
	time.sleep(1)
	P0.value(1)
	P1.value(1)
	P2.value(1)
	
	time.sleep(1)
	P0.value(0)
	P1.value(0)
	P2.value(0)

It can be seen that the OUT of GPIO can work, but P0 and buzzer are connected, the buzzer sounded.

The problem with IN is that when WIFI is running, ADC2_CH cannot work, such as P0(ADC2_CH8), but DAC_1 can be used.

Other pin functions are not affected In pin-define.

1 Like

BPI:bit for STEAM education online documents. Arduino,microPython,Webduino :

https://doc.bpi-steam.com/en/latest/

Hello,

could you tell me how to upload the python program into your bpi:bit card? Could you add your card into Mu IDE. Mu IDE is perfect with autocompletion and open source. thanks to help and reply. regards.

Julien

you can see here :

https://doc.bpi-steam.com/en/latest/micropython/tutorials/flash_mpy.html

BPI-Nano and nano robort board

https://www.instructables.com/id/Nano-Robot-Controller-How-to-Use-It/?fbclid=IwAR1RvNGsTXF_I2cbcxx09Up1pj8hUOxrCTSNmFuUfCqSQB5k1bYTvkmc-uY

Hello, could you tell me where to find all the documentation to read all your sensors in micropython on your banana Bit BIp card? And all the documentations to set all your actuactors like LED and buzzer. Thanks to be very precise. Regards.

Julien

Hello,

I had flash yout firmware.bin into bit bip.

I try this program:

from microbit import * while True: sleep(100) temp = temperature() # get temperature ℃ print(temp) display.show(str(temp))

but I had an issue ? MicroPython v1.10-220-ged36cfd56-dirty on 2019-05-28; ESP32 module with ESP32

Type “help()” for more information.

%Run -c $EDITOR_CONTENT 1.2 version No compass 31.3 Traceback (most recent call last): File “”, line 6, in File “display.py”, line 386, in show KeyError: 31.3

Thanks to help. regards.

Julien

Hello,

your display method has got an issue. It does wait until the scroll is finished, and display.show doesn’t works. Issue too with pin1.is_touched(), doesn’t works? same issue with button_a.get_presses() gives 4 all the time?? thanks to help.

regards.

JL

Dear JL,

  1. For the error messages: 1.2 version No compass MPU9250 Error [Errno 19] ENODEV It means that your hardware version is 1.2 with MPU9250 sensor but no compass features.

  2. Please do not use display.show() to display a string, try display.scroll() instead. Since it is imported from “microbit” module, the usage is compatible.

Regards, -tim

Hello,

could you give us all the python API to read all your sensors without using your firmware. in your example we don’t need to import microbit import *. Where is all the documentation to read button, light sensor, etc… who to set RGB led, buzzer, etc… in python? Thanks to be very precise. regards.

JL

Hello,

Ok, but same issue with button. So please help me? Regards

JL

Dear JL,

May you provide more detailed information regarding the button issues?

-tim

Hello,

could you just read my last post please, I explain all: Hello,

your display method has got an issue. It does wait until the scroll is finished, and display.show doesn’t works. Issue too with pin1.is_touched(), doesn’t works? same issue with button_a.get_presses() gives 4 all the time?? thanks to help.

regards.

JL

Hello, I want to use all the network command in blockly. But on your IDE blockly

I found no command for network??!! You provide the same commands as the microbit card. You still have not understood that the big interest of your card was precisely to offer a new card which finally allows the wifi connection which is the very big interest of your card, otherwise we stay on the microbit card. So currently your blockly IDE is strictly irrelevant. I think you still haven’t figured it out. So no one will buy your card.

So please, thank you for offering the same features as those on this site (http://easycoding.tn/esp32/demos/code/) which allows you to: -change IP address -to position in access point or in station mode -send and receive raw data in TCP / IP -to position the card as client or server -to communicate with an IOT platform like thingspeak or other.

This is the real interest of your card, for the rest, the microbit card already does it very well. Please provide these features quickly. Thanks to help. Regards.

Julien

Dear JL,

I did read the previous posts, just could not figure out what problem you encountered. Could you please provide the “source code”, so we can understand and fix it asap.

-tim

1 Like